PortableApps.com provides free and open source portable SW that can be downloaded and run separately from the PortableApps.com Platform™ management system. When launching apps independently from the platform, the splash screen can be annoying. Although an option exists to disable the splash screen from the PortableApps.com Platform’s™ “Advanced Preferences”, this doesn’t apply to independent apps not using this platform. Thankfully, this is easily fixed by modifying a single file.
How to disable the splash screen for your application
Open the application’s folder and drill down to the /Other/Sourcedirectory.
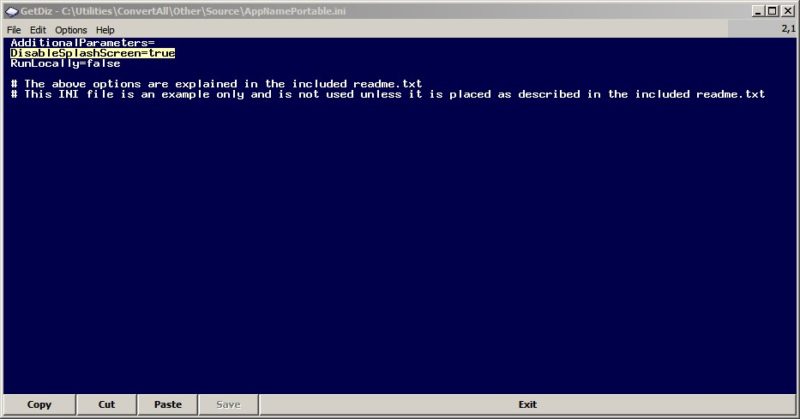
In the Sourcedirectory open AppNamePortable.ini with a text editor. In some cases an .ini file already exists with the application’s name in this directory. In any case, there will only be one .ini file in this directory. Open this file and go to the next step.
Change the line DisableSplashScreen=false to DisableSplashScreen=true (see screenshot below. Click to enlarge).
Use “save as” to save the file with the name of the application and the .ini extension (e.g., ConvertAllPortable.ini).
Close the text editor and copy or move this file to the application’s main directory.
That’s it. The .ini file will override the default configuration when starting the application. There should be a noticeable difference in how quickly the application starts. If you still have a splash screen, make sure that the .ini file just moved to the application’s main directory is correctly named. For example, if the application name is ConvertAllPortable.exe, the .ini file should be ConvertAllPortable.ini.
Update 03/27/2015 – According to a recent GHacks article, the Broadcom wireless drivers exist on the Mint installation media. If correct, that would be an easier solution and certainly worth trying. If not successful, then come back and try the solution described below.
After an upgrade from Mint 13 to Mint 16 using the “fresh upgrade” method again resulted in a system without wireless connectivity, this guide was created for future reference and possibly as an aid to others experiencing the same problem. The information here applies to the B43 driver, specifically for the 4311 PCI-ID/Chip ID, but the driver/firmware solution described may be similar for other Broadcom PC-IDs also using the B43 driver (see list below) and running on Debian/Ubuntu or derivative distros; however, keep in mind that derivative doesn’t imply compatibility in all cases. For further information about B43/B43 legacy wireless devices and driver/firmware solutions see https://wireless.kernel.org/en/users/Drivers/b43.
Similar PC-IDs for B43: 14e4:4307 14e4:4311 14e4:4312 14e4:4318 14e4:4319 14e4:4320 14e4:4357 14e4:5354
Note that in most cases PCI-ID correlates to the Chip ID, but that is not always the case, so identify your device using the PCI-ID.
Regardless of the PCI-ID, always check the distro’s documentation and user forums for the most up-to-date information. Broadcom wireless solutions change constantly and often vary from distro to distro.
System used for this Guide
The system used for this guide was an Intel Pentium T2310 / 1.46 GHz ( Dual-Core ) laptop with Mint 16 (Mate) freshly installed to the hard drive. The built-in wireless device was based on the BCM 4311 chipset. No other options existed at the time for connecting to the Internet except for wireless, which wouldn’t work after the OS installation.
Broadcom Wireless Issues
In the past, wireless connectivity issues in Linux for devices using the popular Broadcom chipset were a common problem that often turned into a difficult, confusing and time-consuming task. Considerable time and effort was often spent performing multiple trial-and-error driver installations, command-line troubleshooting, reading and evaluating technical documentation, and following suggestions from other users to get wireless working.
Although some Linux distros support Broadcom wireless out-of-the-box or provide options within the OS to install the correct drivers/firmware, most do not because of a variety of ongoing development, proprietary and support issues. When users search the Web for answers, this often results in page after page of possible solutions and troubleshooting suggestions, many which may be out-of-date and therefore may no longer work. The amount of information can overwhelm and confuse users desperate for an easy and quick solution. An informative Archlinux.org Wiki entry (2013), Broadcom Wireless, describes many of these issues and illustrates why so much confusion and seemingly conflicting information exists about getting wireless to work for Broadcom devices in Linux.
Current Support Issues
Fortunately, driver/firmware support and installation options for Broadcom wireless devices have steadily improved and don’t require as much user effort or technical expertise as before; however, this doesn’t mean that problems are now a thing of the past. Many users may still need another PC to hunt the Web for the correct drivers, may find themselves the frustrating catch-22 position of needing a LAN connection in order to install the drivers, or learn that the correct drivers are not clearly specified, or when specified, are not included with the installation media.
For some Linux distros, B43 driver/firmware installation can be an automated or a semi-automated process. Some distros feature automatic installation for B43 devices by detecting and installing the appropriate driver package during the OS install from the installation media or through a LAN connection, and some may include them with the kernel image. Others, like Ubuntu/Debian and their derivatives, may even provide customized installation files (like a deb file) from their support forums or web site that can be downloaded and double-clicked to automatically install the appropriate drivers/firmware. Note that some deb files don’t include the drivers and may require a LAN connection in order to download them separately (another catch-22 situation if you don’t have a LAN connection).
When any of the previously mentioned B43 wireless driver/firmware installation options are not available or easily identified, users can still enable wireless using an extraction tool and the open source or proprietary drivers to manually install the firmware – this is the process described in this guide.
Generally, three categories of wireless driver/firmware solutions exist for Linux users with Broadcom chip-sets:
1. brcmsmac/brcmfmac/brcm80211 – Open source kernel driver (newest, often included with the latest kernel images) 2. B43/B43 legacy – Open source reversed-engineered kernel driver (B43 only is covered in this guide, B43 Legacy is not covered) 3. broadcom-wl – Proprietary Broadcom STA driver
The necessary driver/firmware is dependent on the chipset/PCI-ID, type of wireless device, operating system, CPU architecture, and the OS version (note that some Broadcom wireless devices are still unsupported in Linux). Regardless of the chipset/PCI-ID, the distro’s documentation and user forums should always be checked for the latest information since driver solutions and installation options vary from distro to distro and even between versions within a distro.
Identifying the Wireless Device
To identify a Broadcom wireless device in Linux, type the following command (case-sensitive) into a terminal:
lspci -vnn -d 14e4:
The above is the output of the lspci command. The PCI-ID is identified within the brackets on the 2nd line by 14e4:4311, where 14e4 is the identification code for Broadcom, and 4311 is the device. In this case, 4311 also identifies the Chip ID. The <access denied> after Capabilities is displayed because the lspci command was executed without using administrator privileges (sudo or su).
Additional wireless identification and troubleshooting commands can be found at the Ubuntu Community Help Wiki.
Tested Solution – Install firmware from driver source file
The verified solution for this guide was to use another PC to download the necessary files onto a USB flash drive and then transfer those files to the user directory on the Linux Mint 16 PC with no Internet connectivity. The files needed were fwcutter (a deb file) and the Broadcom-wl proprietary driver source file. Fwcutter is a tool written for BCM43xx driver files to extract firmware from driver source files.
Steps:
1. Download b43-fwcutter for your architecture (bottom of page) from https://packages.debian.org/squeeze/b43-fwcutter. In this case, b43-fwcutter_013-2_amd64.deb was used, but an older version or a 32-bit version probably would have worked as well.
2. Download the source file from https://mirror2.openwrt.org/sources/. In this case, broadcom-wl-4.150.10.5.tar.bz2 was used. Scroll down the page to locate the broadcom files entries.
3. Transfer the files to your user directory on the Linux Mint PC and double-click the b43-fwcutter file to install it. Ignore any warnings about the version being out-of-date.
4. Run the following commands to extract and write the firmware to /lib/firmware. Ignore any warnings.
tar xfvj broadcom-wl-4.150.10.5.tar.bz2
sudo b43-fwcutter -w /lib/firmware broadcom-wl-4.150.10.5/driver/wl_apsta_mimo.o
5. Reboot the PC.
6. The wireless should now work. If so, look for and install any updated B43 wireless firmware/fwcutter/drivers using the Synaptic Package Manager. Do not use B43 legacy.
Recreating directory structures can be a tedious and error-prone chore, especially if using the right-click method to create multiple structures and folders. This guide describes three methods to easily copy directory structures (without files) in Windows: (1) with the command line, (2) with GUI tools dedicated for that purpose, and (3) by configuring a freeware file manager, FreeCommander, to enable this function.
Copying Directory Structures from the Command-line
For those comfortable with the command-line, two commands that can be used for this purpose are the Xcopy and Robocopy, both of which have tons of options. Although others, such as the FOR command could also be used, Xcopy and Robocopy are by far the most popular tools used for this purpose.
Xcopy
Xcopy is included in systems up to Windows 8. XCOPY stands for extended copy. It’s a more powerful version of copy with additional features that can copy files, directories, and whole drives. Note that although Xcopy is included with most versions of Windows, it has been deprecated in favor of RoboCopy.
To use Xcopy to clone a directory without files, use the following syntax:
xcopy /t /e "C:\Your Folder" "C:\New Folder"
/t = Copies the subdirectory structure, but not the files
/e = Copies subdirectories, including any empty ones
When using Xcopy with the above switches, you may be asked to specify whether the target is a directory or a file before the Xcopy command executes, but if the command is executed from a batch file, no user interaction is required.
Note: Xcopy doesn’t display any progress or completed operations information when executed. If the target directory doesn’t exist, it will be created.
Robocopy stands for “Robust file copy.” It’s a standard feature for Windows starting with Vista. It’s can also be installed in WinXP as part of the Windows Resource Kit.
To use Robocopy to clone a directory without files, use the following syntax:
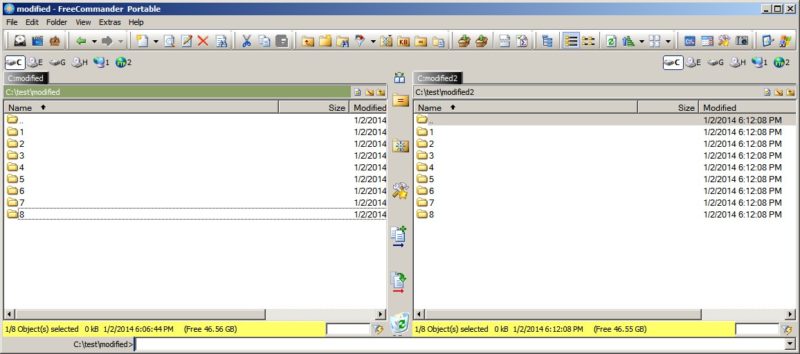
Note: Robocopy displays progress and completed operations information when executed as shown in the below screenshot. If the target directory doesn’t exist, it will be created.
Note: Remove the .txt extension before using either batch file.
Freeware GUI Tools for copying Directory Structures
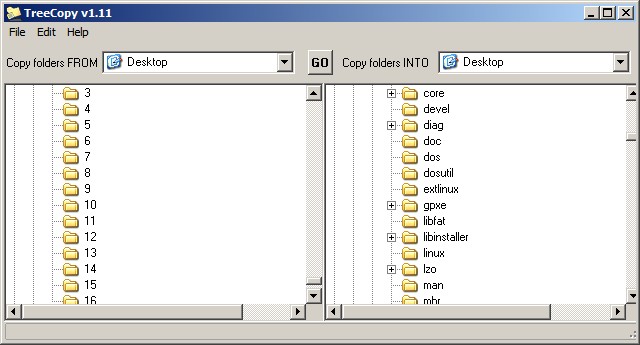
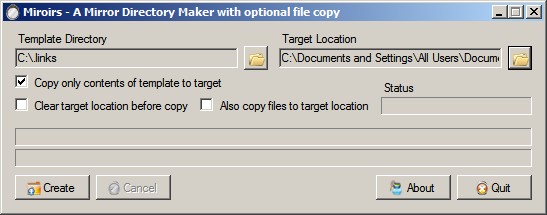
Two easy-to-use GUI (graphical user interface) apps dedicated specifically to creating directory structures without files are TreeCopy and Miroirs:
TreeCopy – Portable and freeware. Runs on Win95 to Win8.
Miroirs – Freeware. Requires installation. Runs on XP/Vista/Win7
xcopy Frontend – Freeware. Portable. Runs on Windows XP or later. Provides an overview of all available parameters and makes it easy to select the needed parameters. Each parameter can be activated by clicking on it. The finished command line can be copied or executed directly.
FreeCommander setup to copy Directory Structures
FreeCommander is a freeware file manager that can be configured to copy directory structures using a customized batch file with the Xcopy and/or Robocopy commands. FreeCommander Ver. 2009.02b was used for this example. These instructions are modified from those provided on the FreeCommander forums.
FreeCommander Instructions
Create a batch file with the following code and save it with any name desired such as “copyFolderStructure_freecommander.bat.” For Xcopy the batch file’s main code consists of:
xcopy %1 %2 /t /e
%1 and %2 are the first and second parameters passed to the batch file (structure to copy and target) The /t and /e options are the same as above
For Robocopy the batch file’s main code consists of:
robocopy %1 %2 /e /xf *
%1 and %2 are the first and second parameters passed to the batch file (structure to copy and target) the /e and /xf * options are the same as above
Download example xcopy and robocopy batch files for FreeCommander:
Note: a pause may be entered at the end of either of the batch files below to keep the command window open for viewing the output. Remove the _.txt extension before using.
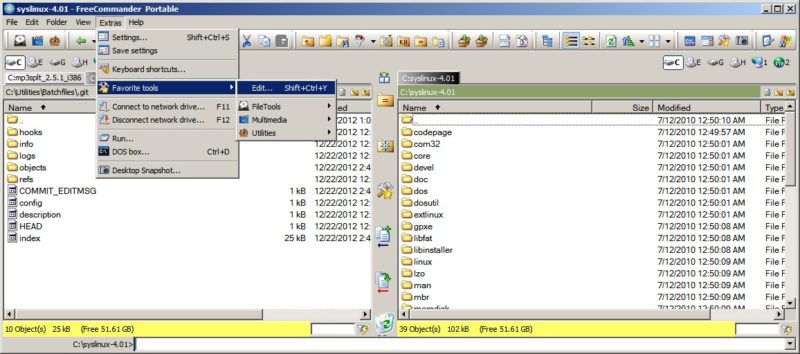
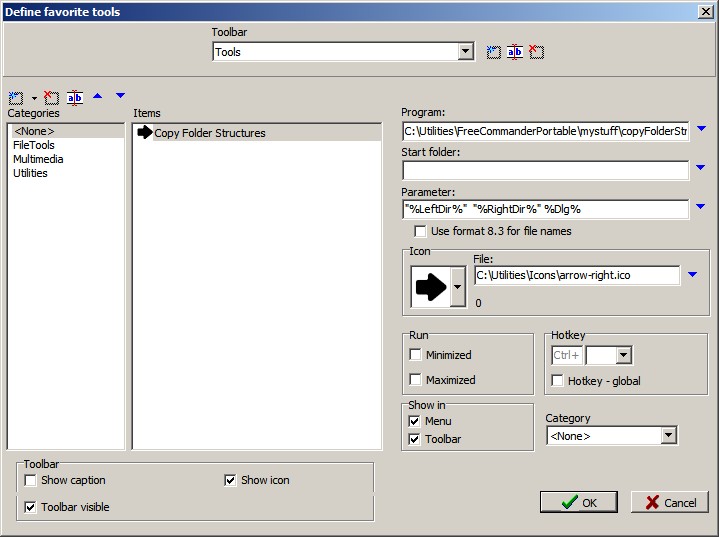
From the menu, select Extras->Favorite Tools->Edit or use (SHIFT+CONTROL+Y). Click the image below to enlarge.
Select none from the left-hand column named Categories, then click once in the Items column.
Use the Items:Add to list button that appears above the Items column to create an item, for instance Copy Folder Structure.
Select Seek program by clicking the blue arrow next to the program field to navigate to and select the saved batch file’s (e.g. C:\tools\copyFolderStructure_freecommander_robocopy.bat) full path into the program field.
Enter the following into the parameter field:
"%LeftDir%" "%RightDir%" %Dlg%
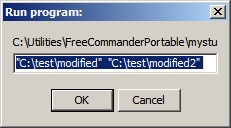
The variables, %LeftDir% and %RightDir%, pass the address of the left and right folders to batch file parameters %1 and %2. The %Dlg% variable is optional and may be omitted if desired. It is used to display a Run program window (screenshot below) before actually starting the script to allow the folder names to be verified. It also provides a way for the operation to be cancelled.
If desired, add an icon by using the blue button next to the icon field to navigate to the icon’s location.
Make sure the boxes are checked as in the Define Favorite Tools screenshot above before hitting OK.
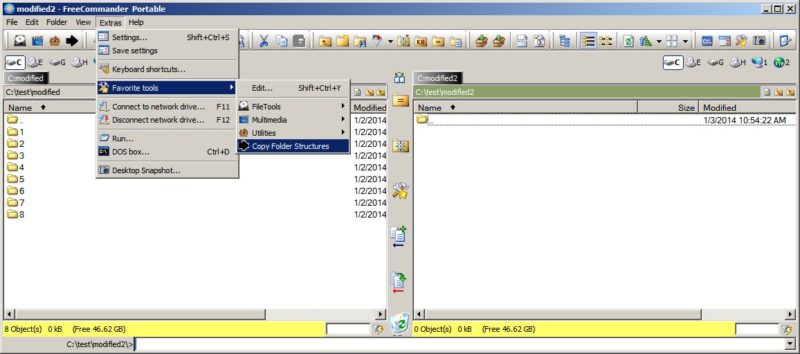
Tool Selection The toolbar now contains an entry for copying Folder Structures. The tool can be selected from the menu with Extras->Favorite Tools->Name of your tool or by using the favorites icon (make sure Extras is enabled in Extras->Settings->View->Toolbar if it’s not visible on the toolbar).
Using FreeCommander
To use, select the structure to copy in FreeCommander’s left pane and select the target directory in the right pane. Select and click your tool from the toolbar or menu as described above. After the Run program dialog appears, click OK to continue.
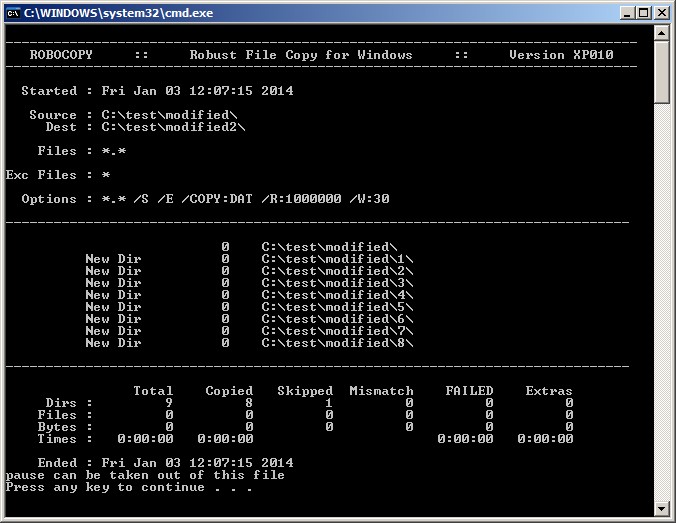
Xcopy doesn’t provide an option to display progress or completed operations. However, with Robocopy, the output will display the copy operation details as shown below (a pause was used in this batch file):
Robocopy Output
If no errors occur, the folder structure will be copied as in the following screenshot:
Since version 1.98, GRUB 2 began replacing GRUB version 0.9x, which is now known as GRUB legacy. GRUB 2 represents a major revision over its predecessor to make it more portable and modular. And although GRUB legacy is no longer being developed, bug fixes for it continue, and it’s still used as the default boot loader for a number of Linux distros. Over time, GRUB 2 usage has steadily increased and while still a work in progress, it’s probably the most common boot loader for Linux distros. Although GRUB 2 is officially known as GRUB, Linux distro repositories may include GRUB 2, GRUB legacy, or both versions. Repositories that include both versions may make the distinction between them as GRUB 2 and GRUB, GRUB and GRUB legacy, or GRUB 2 and GRUB legacy. The naming inconsistency between distros can be somewhat confusing, but this is to be expected during any transition.
What is covered in this guide
This is not a comprehensive guide on GRUB 2; rather, this is a quick reference covering frequently used GRUB 2 tweaks and option edits for most Linux distros; particularly those based on Debian/Ubuntu/Mint or Slackware. For detailed information about GRUB 2, see the references at the end of this guide.
This guide assumes that the reader already has GRUB2 installed for a single boot or a multiboot Linux system. Note that all changes to GRUB 2 options must be done while logged in as root or by use of sudo. All commands and options described should be verified for correctness using the documentation for your particular Linux distribution.
GRUB 2 summary
Recent converts to GRUB 2 probably have noticed that the Boot menu basically looks the same as GRUB legacy. Although they appear similar, the way GRUB 2 generates its menu is very different. Also, GRUB 2 now places its files in three locations:
/boot/grub/grub.cfg (GRUB 2 main configuration file, replaces menu.lst, a product of the script files in /etc/grub.d/)
/etc/grub.d/ (directory containing several GRUB 2 script files)
/etc/default/grub (GRUB 2 customization file)
Most GRUB 2 files are updated/regenerated automatically during package updates, when new kernels are added, after installing additional OS’s on multi-boot systems, or whenever GRUB is manually updated after making changes to the GRUB options as described in this guide. Generally, editing these files is not recommended, not only because it can cause boot problems, but also because most of the files will be overwritten anyway during system updates. The single file that users can generally edit without issue is /etc/default/grub, which holds most of the settings that will be of interest to users reading this. This file contains customization settings such as the default menu entry, timeout, default boot, graphics, and more. An example GRUB file from Lubuntu 12.10 (original settings slightly modified) is shown below:
# If you change this file, run '<strong>update-grub</strong>' afterwards to update
# /boot/grub/grub.cfg.
# For full documentation of the options in this file, see:
# info -f grub -n 'Simple configuration'

<span style="color: #000000;">GRUB_DEFAULT=0</span>
<span style="color: #000000;">#GRUB_HIDDEN_TIMEOUT=0</span>
GRUB_HIDDEN_TIMEOUT_QUIET=true
<span style="color: #000000;">GRUB_TIMEOUT=-1</span>
GRUB_DISTRIBUTOR=`lsb_release -i -s 2> /dev/null || echo Debian`
<span style="color: #000000;">GRUB_CMDLINE_LINUX_DEFAULT=""</span>
GRUB_CMDLINE_LINUX=""

# Uncomment to enable BadRAM filtering, modify to suit your needs
# This works with Linux (no patch required) and with any kernel that obtains
# the memory map information from GRUB (GNU Mach, kernel of FreeBSD ...)
#GRUB_BADRAM="0x01234567,0xfefefefe,0x89abcdef,0xefefefef"

# Uncomment to disable graphical terminal (grub-pc only)
#GRUB_TERMINAL=console

# The resolution used on graphical terminal
# note that you can use only modes which your graphic card supports via VBE
# you can see them in real GRUB with the command `vbeinfo'
<span style="color: #000000;">GRUB_GFXMODE=auto</span>

# Uncomment if you don't want GRUB to pass "root=UUID=xxx" parameter to Linux
#GRUB_DISABLE_LINUX_UUID=true

# Uncomment to disable generation of recovery mode menu entries
#GRUB_DISABLE_RECOVERY="true"

# Uncomment to get a beep at grub start
#GRUB_INIT_TUNE="480 440 1"
Quick Edits for /etc/default/grub
Note: A grub file can contain many more options than those shown in the above file. For a full list of options refer to the GNU Grub Manual (link in reference section below). Note that all GRUB 2 commands or changes to its files must be done while logged in as root or by using sudo.
As previously mentioned, the above sample GRUB 2 file is essentially the same as the default file for Lubuntu ver. 12.10. Note that the option entries listed in the above file may differ for other Linux distributions and/or versions. In most cases, users will want to make minor changes to the option entries that are common to all distributions and/or versions, such as timeout, default boot OS, displayed boot information (quiet splash), or the display resolution. To enable a listed option, remove the comment (#) in front of the option entry and change its value as appropriate. If a desired option is unlisted, it may be added to the end of the file. Also notice that the above file contains comments that provide information for enabling/disabling many of the listed options. After making any change to this file, it must be saved and GRUB updated in order for the changes to take effect on the next boot (see saving and updating section below). A few common option entries are described as follows:
GRUB_DEFAULT=0 Default option setting is 0. This is the default menu entry to be booted. Zero (0) is the first boot option listed in /boot/grub/grub.cfg.
GRUB_TIMEOUT=-1 Default option setting is 5. Sets the time in seconds that the boot menu displays before it automatically boots the default boot entry. If a key is pressed before that time, the timeout is cancelled, allowing manual selection of the entry with no time limit. The value “-1” causes the menu to be displayed indefinitely.
GRUB_CMDLINE_LINUX_DEFAULT=”” Default setting is distro dependent. Passes arguments to the end of the boot command line for the kernel of the menu’s default entry. Added in addition to any arguments specified in GRUB_CMDLINE_LINUX below. This option is often set to “quiet splash” to suppress boot information and display the splash screen. Note that “quiet” and “splash” are separate values. Remove “quiet splash” between the parentheses to display all boot information without a splash screen.
GRUB_CMDLINE_LINUX=”” Default setting as above. Passes arguments to the end of the boot command line for the kernels of all the menu entries.
GRUB_GFXMODE=auto Default setting is “auto”. Sets the graphical terminal resolution. Only modes supported by the graphics card VESA BIOS Extensions (VBE) can be used. To determine the available screen resolutions, type “c” for a command line at the GRUB 2 boot menu and then enter “vbeinfo.” The syntax for the option value is widthxheight[xdepth]. Some common option values are 1400x900x32, 1024×768, and 800×600.
#GRUB_DISABLE_RECOVERY=true Recovery mode entries are generated by default. Enable by removing #, which will disable generation of the recovery mode entries; otherwise, for each Linux kernel, at least two menu entries will be generated – the default entry and a recovery mode entry.
Saving and updating the edited /etc/default/grub file
After editing and saving the /etc/default/grub file the following command must be executed for the changes to take effect:
sudo update-grub
To restore the default settings for GRUB 2, reinstall GRUB 2 by executing the following command:
sudo grub-install /<target>
Where <target> /dev/sda, /dev/hda
GRUB 2 tools
Graphical tools for configuring Grub 2 have become more common as Grub 2 matures. One GUI tool available on many repositories is grub-customizer. See this How-to-Geek article for a description of this tool.
Changing the GRUB 2 background image
Good tutorials describing how to change the GRUB 2 background image:
Placesbar Editor is a freeware tool that provides a convenient way to change any of the five folders on the Places Bar menu to whatever you want without directly editing the registry. PlacesBar Editor works in Windows 2000/ME/XP/Vista and Office. For Vista and above, the ability to change the Places Bar is built into the operating system, but apparently not for the Basic and Home Editions of Vista or Win7. For Vista or Win7 versions other than the Basic or Home editions, see WinVistaClub’s article: How To Add Your Own Folders To The Places Bar Or Favorite Links. In any case, for XP and older systems, this is a must-have utility. For further information, see the review on PlacesBar Editor at Freeware Genius.
 PortableApps.com provides free and open source portable SW that can be downloaded and run separately from the PortableApps.com Platform™ management system. When launching apps independently from the platform, the splash screen can be annoying. Although an option exists to disable the splash screen from the PortableApps.com Platform’s™ “Advanced Preferences”, this doesn’t apply to independent apps not using this platform. Thankfully, this is easily fixed by modifying a single file.