18. August 2010 · Comments Off on Test Bootable USBs with a Virtual Machine · Categories: Multiboot USB · Tags: Windows
Last updated on 12/12/2022

This guide shows how to use the open source Virtual Machine (VM) emulator manager, QEMU Manager, to test bootable USB drives in Windows without restarting your computer. QEMU Manager is a free, simple and fairly fast GUI for the QEMU Emulator that makes creation of Virtual Machines a breeze with easy-to-use wizards. Its performance is very good in comparison to other emulators and it comes in installable and portable versions. QEMU Manager can be downloaded from here. QEMU Manager version 7.0 was used for this guide.

Update (12/17/12): Another tool, Quemu Simple Boot, also can boot USBs, CD/DVD images and discs using QEMU from a simplified UI that allows drag and drop. It provides a quick and convenient way to test multiple flash drives or to continually boot the same flash drive for testing purposes.

QEMU Window

Installation

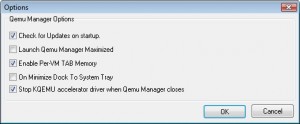
For the installable version of QEMU Manager, enable KQEMU accelerator support for faster performance during the install process. For the portable version, enable it from the tools menu. For both the installable and portable versions, once QEMU Manager is installed and running, select “Stop KQEMU accelerator driver when QEMU Manager closes” from Tools->QEMU Manager Options (see below).

qemu options

Creating a Virtual Machine

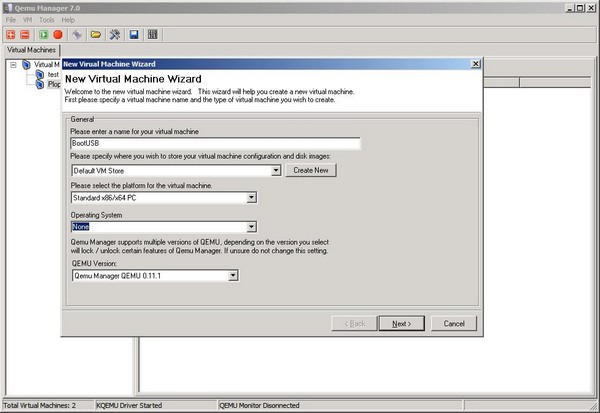
After installation, click on the “+”  (plus) button to create a new VM (Virtual Machine). The wizard will appear.  Fill in a name for the VM (BootUSB used in this case) and use None for the operating system. Use the defaults for the other options and click next.

Create VM

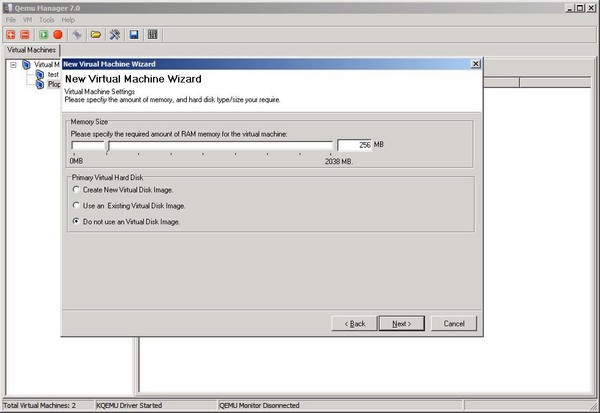
For Virtual Machine Settings, select Do not use a Virtual Disk Image. Use the defaults for the other settings.  Click next.

VM Wiz Memory and Virtual Drive

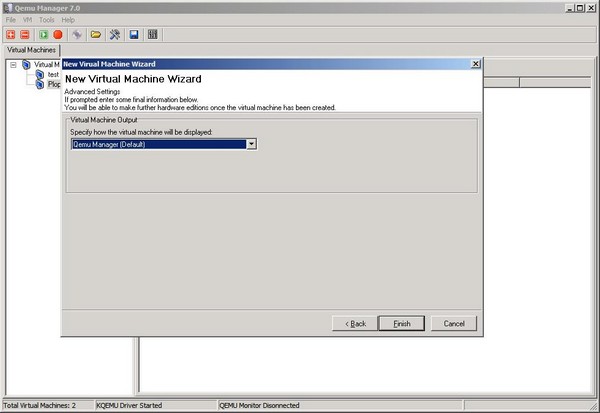
For the advanced settings, use the default setting (Qemu Manager). Click Finish. The new VM (BootUSB) will now be visible in the left panel. If not already plugged in, insert your bootable USB drive. To reduce chances of selecting the wrong USB drive, make sure you have only one external drive connected to your computer.

Advanced Settings

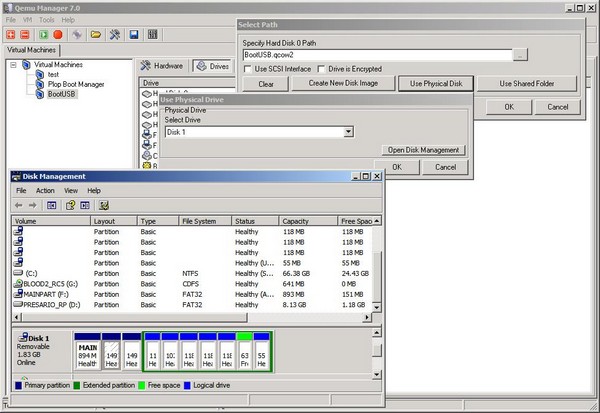
With the new VM (BootUSB in this case) selected in the left panel, click the Drives tab on the right panel. If the Select Path dialog doesn’t appear, then double-click Hard Disk 0 in the right panel window to make it appear. In the Select Path dialog, click the Use Physical Disk button. After the Use Physical Disk dialog opens, select the Open Disk Management button. Identify your USB drive in the Disk Management window. In most cases, this will be Disk 1 (Disk 0 is the hard drive).

Close Disk Management and select your USB drive identified in Disk Management in Use Physical Drive. Click OK to close the Use Physical Drive dialog. Your USB will now appear in the Select Path dialog, most likely as \\.PhysicalDrive1 if you have only one hard disk in your PC and one USB drive connected to it. Click OK to close the Select Path dialog.

Select Drive Screens

Caution: Never attach the Primary hard disk (usually Disk 0) to a Virtual Machine and Boot it!

Setting the boot order for your new Virtual Machine:
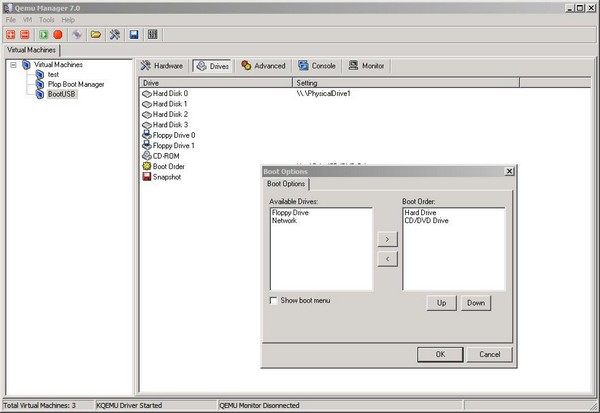
Back at the main Qemu window and with new VM (BootUSB in this case) selected in the left panel, click the Drives tab in the right panel. Double-click the Boot Order icon in the right panel column to open the Boot Options dialog. Use the up/down button to move the hard drive to the first position and then click OK to close the dialog. The setup is complete. QEMU Manager is now ready to start booting USBs.

Boot Order

Booting USBs in a VM with Qemu Manager

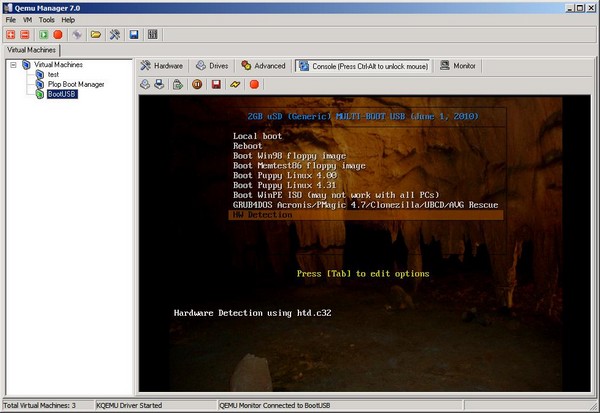
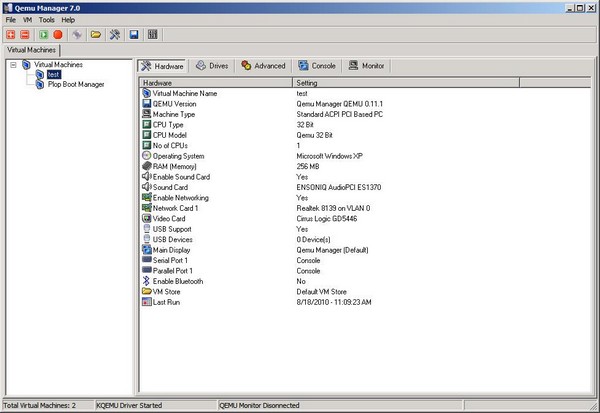
Using Qemu Manager makes testing bootable USBs fast and easy. To boot a USB drive in the virtual machine, just select the virtual machine to boot in the left panel and click the green arrow on the menu. To close the VM, click the red button.  To toggle control (mouse, keyboard, etc) between the VM window and the computer, press the keyboard’s Control and Alt buttons. The running application shown in the VM can be manipulated just as if the USB was cold booted from your computer. See the documentation for further information or just play around with the buttons on the main menu. Note that a secondary menu will also appear just above the VM’s window after it’s launched.
Boot Screen


Share
19. December 2009 · Comments Off on Recovering from an Accidental Partial Format of an External USB Drive · Categories: Linux, Windows · Tags: Data Recovery, Windows
Last updated on 11/13/2023

If you ever accidentally formatted an external drive on a PC with several plugged-in USB devices, you probably remember seeing them listed in the formatting tool’s selection box. The (C:) and (D:) drives may be listed, which are usually the boot drive and the backup drive. If an (E:) is displayed, it’s probably the optical drive. However, distinguishing between the other drives or devices may not be as apparent, especially when information beyond the drive letter assignment isn’t shown. This is particularly true for drives or other USB  devices that don’t have identifying information on them. Under these conditions, it’s easy to become careless or impatient and select the wrong drive; especially if its letter assignment appears to be correct. If you are unlucky, you may notice a flashing light on the device confirming that the wrong drive is being formatted.

mystica_USB_Flash_Drive (public domain clip art www.clker.com)

I did this recently when in a hurry and chose the wrong drive letter. Instead of formatting the flash drive, the external 250GB backup drive was formatting. Panicking, I immediately realized the error and stopped the formatting process – but it was too late. Checking the hard drive, I found it couldn’t be accessed. The drive letter was still visible in Windows, but no files or folders were displayed and nothing could be written to or read from the drive.

Fearful of losing the data, I tried several file recovery tools with no success until using TestDisk. TestDisk is a free (open source) data recovery tool available from CGSecurity. With TestDisk, I was able to successfully restore the drive’s partition and it worked normally.

Luckily, all of the data was still intact. That’s because during a high-level format (quick format), only the external drive’s partition table information or boot sector are erased. According to Windows Help Central, even a full format can be recovered pretty easily as long as the original files are not overwritten with new data. That’s because the spaces containing file information on the disk drive are not really wiped clean, but instead, the areas where files are stored are marked as available for new data. As long as no new data is written to the drive, chances are excellent that the data is 100% recoverable using simple freeware data recovery tools. That’s because if you hosed the partition table or MBR (Master Boot Record) during the format process, the drive isn’t likely to be writable anyway.

TestDisk is a utility that can be used to restore corrupted and missing MBRs, partition tables, and data. TestDisk works on most operating systems including Windows, Linux, BSD, SunOS, and Mac OSX and it’s included with many Linux LiveCD distros such as PartedMagic and many others. It’s a very useful and sophisticated tool in the hands of experienced users. Unfortunately, because data recovery can be a complex issue, inexperienced users may find it “user unfriendly”. However, documentation for the program is thorough and one can find many examples, technical notes, and step by step instructions in the documentation section on TestDisk’s Wiki. Also, the TestDisk Step by Step guide contains plenty of screen-shots which greatly helps in the data recovery process.

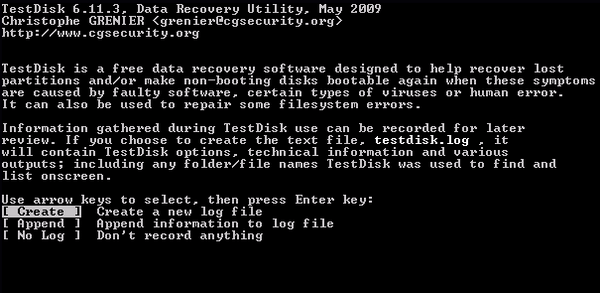
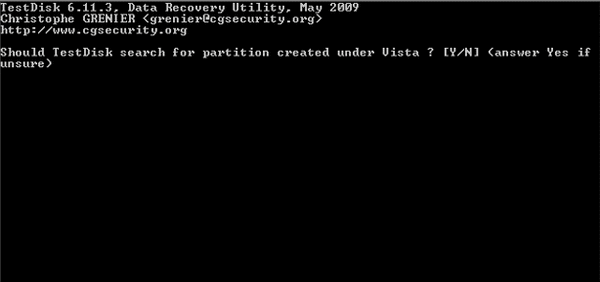
The following screen-shots show what to expect after starting TestDisk for recovering a deleted partition (note: the screens below show the results for a working hard drive that doesn’t have any problems).


Above is the first screen. For most cases,  select the default option – Create a new log file.


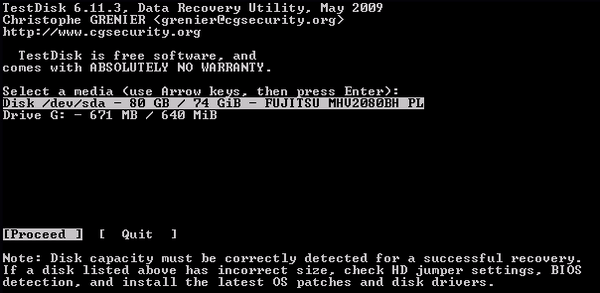
Next, select your media device with the problem. In the screen above, the main hard drive is selected.


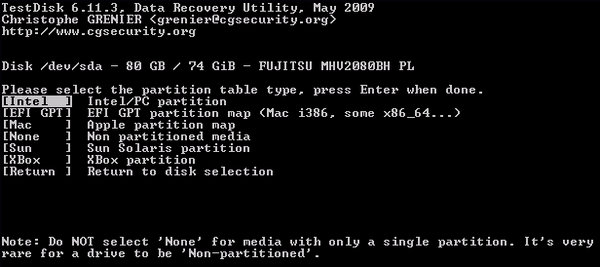
Select Intel if using a Windows or Linux machine.


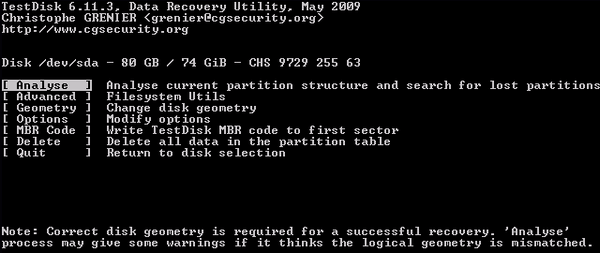
In most cases “analyse” should be selected.

FYI, “Advanced” provides options to restore the boot sector or to create images for partitions.

analyse
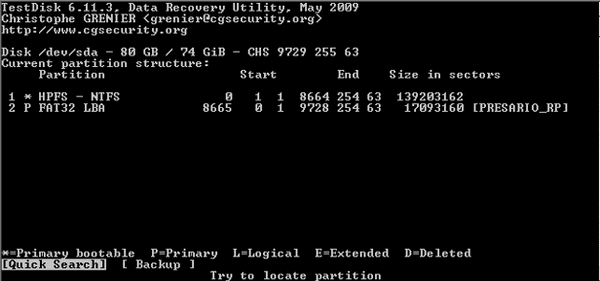
Analyses displays a preliminary list of the current partitions for the drive selected. Next, select Quick Search to continue searching for additional partitions.

quicksearch
“Yes” should be selected for most situations.

selectpartition
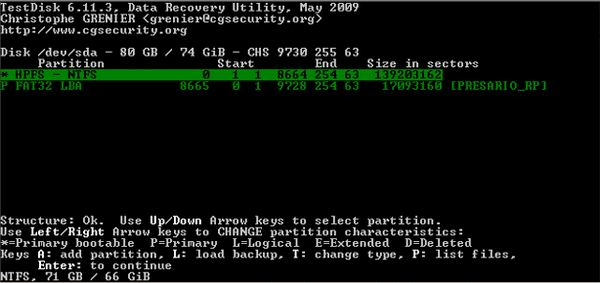
TestDisk displays the structure analysis results and displays the partitions. Healthy partitions will be highlighted in green. Here, you can use the up/down arrow keys to select a partition to further analyze or recover, then hit ENTER. 

Pressing “P” will list the files in the partition, which can provide some assurance that the data is still intact. Do not use the left/right keys – they are used to change the partition’s characteristics!

deepersearch

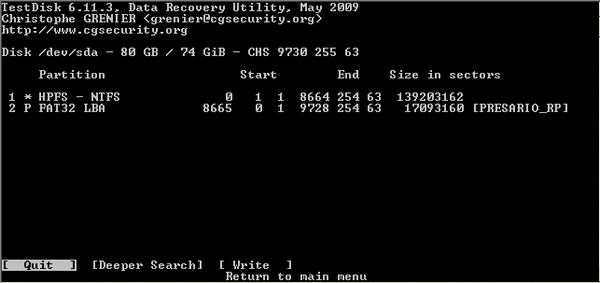
If the partition you want to restore is listed, select “Write” and then Enter to restore it and that should be it. If TestDisk didn’t find your partition, you have the option to perform a deeper search by selecting “Deeper Search”. In the screenshot above, the results show that no problems were found (the screenshots are for a working hard drive).

For more information, the TestDisk Wiki’s Step by Step instructions explain the recovery procedure well enough so that even novices shouldn’t have a problem.

—————————————————————————————————————————————————————————

Other TestDisk how-tos:

The How-to-Geek explains recovering partitions with TestDisk using an Ubuntu LiveCD (ver 9.10):

Recover Data Like a Forensics Expert Using an Ubuntu Live CD

A MakeTechEasier how-to for data and partition recovery using TestDisk:

How to Recover Data and Partitions for Free with TestDisk

Other Data Recovery Utilities

If the drive is still accessible or if only a few files are missing, you may want to try one of the easier-to-use file recovery programs listed below before trying TestDisk. Some that I’ve successfully used in the past to recover lost data are:

Recuva

Restoration

PhotoRec

Install or Recover MBR or Boot Sector

If you know the problem is a damaged or missing MBR (Master Boot Record), a number of tools can be used to repair or restore it – including TestDisk.

MBR Recovery:

Write a new MBR with TestDisk:
  1. Start TestDisk
  2. Create a new logfile
  3. Select a media
  4. Select partition table type (Intel, Mac, Sun, etc)
  5. MBR code (this writes a new MBR)

Below are are other tools and resources that can be used to install, repair or restore the MBR. Note that some of the tools listed require that a backup of the MBR was previously saved:

Bootice (restores a saved MBR only)

How to fix MBR in Windows XP and Vista

5 Free Tools to Backup and Restore Master Boot Record (MBR)

MBR, Partition Table and Boot Record Tools

Boot Sector Recovery:

A Sourceforge article describes the procedure for recovering a Boot sector using TestDisk to successfully fix a dual-boot PC (WinXP & Ubuntu) that wouldn’t boot. The procedure is as follows:

Boot Problems:Boot Sector (follow the steps in the either case section for TestDisk as shown below)

  • 1st screen: select No Log and then press ENTER
  • 2nd screen: select the drive to restore and select Proceed
  • 3rd screen: select Intel
  • 4th screen: select Advanced
  • 5th screen: select the partition and select Boot
  • 6th screen: select Rebuild BS
  • 7th screen: type “Y” to confirm

If using the Grub bootloader for a dual-boot system, make sure to update Grub (it may be necessary to use a LiveCD of your Linux distribution to do this).

Summary

If the easier-to-use tools above don’t work for whatever reason, give TestDisk a try to recover the partition, MBR or boot sector, but follow the directions carefully. Although fairly simple, it’s still possible to mess things up so thoroughly that the only way to recover the data would be to send the drive to a very expensive professional data recovery service.

Remember, if you accidentally format or erase files from your external USB drive, don’t panic. Get to work on recovering your data because chances are that it can be accomplished more easily than you think.


Share
Private
research
">Bear

Bad Behavior has blocked 1791 access attempts in the last 7 days.

report