06. January 2012 · Comments Off on Using the WinRAR Command-line tools in Windows · Categories: Batch Files, Windows · Tags: Archiving Tasks, batch files
Last updated on 08/06/2018

This guide describes the use of the WinRAR command-line tools (v5.01) for compressing and uncompressing files in a directory and their use in batch files (for IZArc and 7-zip, see this post). This guide is an extension of a previous post, Automate Zipping Tasks using the Command-line Interface that explained the use of the command-line tools for two free compression utilities, IZArc and 7-Zip. The information in this guide was tested on a Windows PC running Vista.

compression represented by a vise

WinRAR is a popular and powerful archive manager that can be used from the command-line or with scripting languages such as batch files. It includes two command-line tools, rar.exe and unrar.exe, where rar.exe compresses and unrar.exe uncompresses files. Both are located in the “C:\Program Files\WinRAR” folder in the installable version. Although WinRAR is shareware, it can be used on a trial basis for 40 days. Using WinRAR’s command-line tools is similar to those for IZArc and 7-Zip. The syntax for using the WinRAR executables is:

RAR or UNRAR <command> -<switch1> -<switchN> <archive> <files...> <@listfiles...> <path_to_extract\>

To get a listing of the options for the rar and unrar commands, open a command window, cd to the WinRAR directory, and type rar or unrar and then press enter (rar /?  or rar help may also be used, use rar >rar_cmds.txt or unrar >unrar_cmds.txt to print the command options to a file). For more detailed information, open the rar.txt file in the WinRAR directory which contains the RAR console version user’s manual.

Examples to compress a folder:

rar a -r yourfiles.rar *.txt

creates archive yourfiles.rar and compresses all .txt files in the current folder

rar a -r C:\yourfolder\yourfiles.rar *.txt

creates archive yourfiles.rar in C:\yourfolder and compresses all .txt files in the current folder and its subfolders

rar a -r C:\yourfolder\yourfiles.rar C:\otherfolder\*.txt

creates archive yourfiles.rar in C:\yourfolder and compresses all .txt files in otherfolder and its subfolders

rar a yourfiles 

creates archive yourfiles.rar and compresses all files in the current folder, but doesn’t include subfolders (note lack of extension; WinRAR will use the default extension .rar)

“a” command. Adds to the archive

“-r”  switch. Recurses subfolders

Examples to uncompress a folder: 

unrar x c:\yourfile.rar *.gif c:\extractfolder\

extracts all *.gif files from yourfile.rar to c:\extractfolder\ (trailing backslash required) and restores the folder structure

unrar e c:\yourfile.rar 

extracts all files in c:\yourfile.rar to the current folder (folder structure ignored)

“x” command. Extracts with full paths

“e” command. Extracts and ignores paths

Compression example using Multiple Switches:

rar a -r -ep -u -df -x*.bat e_archive.rar c:\test\*.*

compresses all new or updated files from c:\test and its subfolders to e_archive.rar, deletes the files after they are added to the archive, and excludes any files with a “bat” extension,

“a” command adds to the archive

“-r”  switch. Recurses subfolders

“-ep” switch. Adds files to the archive without including the path information. Multiple can exist in the archive with the same name.

“-u” switch. Equivalent to the “u” command when combined with the “a” command. Adds new files and updates older versions of the files already in the archive

“-df” switch. Deletes files after they are moved to the archive

“-x” switch. Excludes the specified file(s) from the operation

Basic rules for WinRAR:

  • When files or listfiles are not specified, all files in the current folder are processed
  • When specifying all files in a folder, yourfolder or yourfolder\*.* are equivalent
  • Folder structures are automatically saved in archives (but not automatically extracted)
  • WinRAR uses the .rar extension by default, but that can be overridden by specifying the zip extension in the archive name
  • Switches and commands are not case sensitive and can be written in either upper or lower case

Another point is that WinRAR doesn’t appear to install to the Windows path environment variable, so it must be specified either at a command prompt, set permanently in the environment variable settings, or specified in a batch file (WinRAR v3.71.0.0 was used for this guide and that may not be the case for all versions).

To set the Windows path environment variable temporarily at a command prompt or in a batch file, use the following command:

set path="C:\Program Files\WinRAR\";%path%

To set it permanently in the Windows path for your PC:

start–>Control Panel–>System–>Advanced system settings–>Advanced Tab–>Environment Variables–>System Variables–>Path–>Edit. Add the path ;C:\Program Files\WinRAR; to the end (don’t forget the single semicolons at the beginning and end). Hit OK three times.

Using WinRAR in Batch Files:

Two batch file examples are provided below, The uncompress_rar.bat file decompresses all .rar files from a folder and places the extracted files into another directory.

The compress_rar_rev2.bat file provides the following compression options for a user specified directory. Option 4 is the most commonly used structure and the most appropriate option in most cases:

  1. Compress files in dir individually (no subdirs)
  2. Compress files in dir and subdirs individually – no paths
  3. Compress all files in dir into a single archive (no subdirs)
  4. Compress all files in dir and subdirs into a single archive
  5. Compress all files in dir and subdirs into a single archive – no paths

Be sure to change the extension(s) to .bat before using either file and edit the folder paths as required. Both of the following batch files temporarily set the Windows path environment variable for the WinRAR application folder when executed.

Batch file downloads:

Print Friendly, PDF & Email
Share
22. October 2011 · Comments Off on Overview to Understanding Hard links, Junction Points and Symbolic links in Windows · Categories: Windows · Tags: Shells/CLI
Last updated on 11/13/2023

Hard Links, Junction Points and Symbolic Links are linking mechanisms used to refer to other files, directories, or volumes.

file link image

Hard Link (or file hard link) – is a file that acts like a representation of another file on the same drive without actually duplicating that file.

Junction Point (or directory hard link) is a type of hard link that acts like a representation of a directory, a partition or another volume.

Symbolic Link (or soft link) is a file similar to a shortcut in that it points to a file name or directory name, but it’s handled at the system level rather than at the application level.

Often confused with shortcuts as well as with each other, Hard links, Symbolic links and Junction Points are not the same; although like shortcuts, deleting either links or junction points usually won’t delete the target and vice versa (see exceptions below). Of the three, Symbolic Links are more similar to shortcuts than either Hard links or Junction Points, and they are generally more flexible, easier to use, and safer. When given a choice, most professionals recommend using Symbolic Links.

Although Symbolic Linking has been around since 1978 and shortly thereafter standardized in UNIX and UNIX-like Operating Systems, it’s been present in Windows only since Vista. Symbolic Linking was introduced in Vista to replace Hard Links and Junction Points and to enhance compatibility with UNIX and UNIX-like systems. Hard Linking for files and support for directory hard links (Junction Points) have been present in Windows since Win2K – often using different implementations in each succeeding Windows version. Because the development of linking in Windows has been relatively recent and ongoing, a number of different linking methods have been included, supported, or made available as third-party add-ons depending on the Windows version. Currently, Hard Links, Junction Points and Symbolic Links in Windows are only supported for the NTFS file system.

Note that Windows does not support Hard Links or Junction Points to directories on remote shares; however, Symbolic Links can point to remote files and directories on SMB network paths.

The differences between Hard Links, Junction Points, Symbolic Links, and Shortcuts are further contrasted below:

Hard Link (Links individual files):

  • A file that acts like a representation of a target file on the same drive
  • Has the same size as the target without duplicating it (doesn’t use any space)
  • Interpreted at the operating system level (SW apps act upon the target through the link)
  • Deleting the Hard Link does not remove the target file
  • If the target is deleted, its content is still available through the hard link
  • Changing the contents through the Hard Link changes the target contents*
  • Must reside on the same partition as the target file
  • Compatible with Win2k and above in Windows

* Some text editors save changed text to a new file and delete the original file, which can break the link. This behavior can be changed in some editors by forcing a save over the original file instead. See discussion at Jameser’s Tech Tips here for more information.

Junction Point (Directory Hard Link):

  • A file that acts like a representation of a target directory, partition or volume on the same system
  • Has the same size as the target without duplicating it (doesn’t use any space)
  • Interpreted at the operating system level (SW apps act upon the target through the link)
  • Deleting the Junction Point does not remove the target*
  • If the target is moved, renamed or deleted, the Junction Point still exists, but points to a non-existing directory
  • Changing the contents through the Junction Point changes the target contents
  • Can reside on partitions or volumes separate from the target on the same system
  • Compatible with Win2k and above in Windows

*A Junction Point should never be removed in Win2k, Win2003 and WinXP with Explorer, the del or del /s commands, or with any utility that recursively walks directories since these will delete the target directory and all its sub-directories. Instead, use the rmdir command, the linkd utility, or fsutil (if using WinXP or above) or a third party tool to remove the junction point without affecting the target. In Vista/Win7, it’s safe to delete Junction Points with Explorer or with the rmdir and del commands.

Symbolic Link (Soft Link):

  • A file containing text interpreted by the operating system as a path to a file or directory
  • Has a file size of zero
  • Interpreted at the operating system level (SW apps act upon the target through the link)
  • Deleting the Symbolic Link does not remove the target
  • If the target is moved, renamed or deleted, the link still exists, but points to a non-existing file or directory
  • Points to, rather than represents, the target using relative paths
  • Can reside on partitions or volumes separate from the target or on remote SMB network paths
  • Compatible with UNIX and UNIX-like systems and with Vista and above in Windows

Shortcut:

  • A file interpreted by the Windows shell or other apps that understand them as paths to a file or directory
  • File size corresponds to the binary information it contains
  • Treated as ordinary files by the operating system and by SW programs that don’t understand them
  • Deleting the shortcut does not remove the target
  • Maintains references to target even if the target is moved or renamed, but is useless if the target is deleted
  • Points to, rather than represents, the target
  • Can reside on partitions or volumes separate from the target on the same System
  • Compatible with all Windows versions

Windows Applications for Creating Links:

A number of applications are available for creating links in Windows including those bundled with the operating system and third-party tools. Some of the more well known are summarized below.

Utilities included with Windows:

  • fsutil – a command line tool included with WinXP and above. It can only create Hard Links for files – it doesn’t create directory hard links (Junction Points) or Symbolic Links. Further information about this tool is available at Commandwindows.com.

usage: FSUTIL hardlink create new_filename existing_filename

  • mklink – a command line tool included with Vista and Server 2008 and above. The most current link creation tool included with Windows. It creates Hard Links, Symbolic Links and Junction Points.

usage: mklink [[/d] | [/h] | [/j]] <NameofLink> <Target>

/d – Creates a Symbolic Link for a directory. If no flag used, creates a Symbolic Link for a file (default)

/h – Creates a Hard Link

/j – Creates a Junction Point

<NameofLink> – The name for the Symbolic Link being created

<Target> – The relative or absolute path of the target

/? – Help

Third-party Tools:

Command line tools:

  • junction.exe – by Sysinternals  – Creates Junction Points and includes additional commands for displaying and deleting them. Runs on Windows XP and higher and Windows Server 2003 and higher.

display reparse point* info usage: junction.exe [-s] [-q] <file or directory>

-q – Don’t print error messages (quiet)

-s – Recurse subdirectories

create usage: junction.exe <junction directory> <junction target>

delete usage: junction.exe -d <junction directory>

*Reparse points are redirections in the Windows file system using user-defined data in tags to identify and process files.

  • linkd.exe – Part of the Windows 2003 Resource Kit  – Creates and deletes Junction Points. (For Win2k, WinXP and Windows Server 2003)

create usage: linkd newdirname existingdirname

delete usage: linkd newdirname /D

Context Menu/Shell tools:

  • Link Shell Extension (LSE)http://schinagl.priv.at/nt/hardlinkshellext/hardlinkshellext.html – Creates Hard Links, Junctions, Volume Mountpoints, and Symbolic Links with the right mouse button. LSE works on all Windows versions supporting NTFS ver 5.0 or later, including Windows XP32/64 and Windows7. To install LSE on XP, see this section from the above article.Note: LSE was tested on a XP32 system to create Symlinks with the context menu and with the command-line executable (ln.exe). The ln command is a standard Unix command that creates a hard link or a symbolic link. To delete Symlink directories, use the rmdir command.
  • NTFS Linkelsdoerfer.name – Creates Hard Links and Junction Points using drag and drop with the right mouse button. Works with Win2K (NTFS ver 5 or greater) and above.

GUI-based tools:

  • Junction Link Magic – Rekenwonder Software – GUI-based application to create, list, and remove Junction Points. Also lists Symbolic Links and Mount Points. Works with Win2K, XP, 2003, Vista, Windows Server 2008 and Windows 7. Junction Link Magic lists all 3 types of links, but only creates and removes junction links.

Combination GUI/Command Line/Context Menu/Shell tools:

  • LinkMaker Cresstone.com appsPortable and easy-to-use application featuring three modes: (1) GUI, (2) shell integration, or (3) command line. Creates shortcuts, symbolic links and NTFS hardlinks/junction points. Requires NET 4.0 or above. GUI capable of drag and drop. Works with Win XP and above.

Tutorials on creating and using Hard Links, Soft Links and Junction Points:

Daniel Einspanjer’s journal How To Use Hardlinks And Junctions In Windows

The Developer’s TidbitWindows File Junctions, Symbolic Links and Hard Links

How-to GeekUsing Symlinks in Windows Vista

Jameser’s Tech TipsTip #37: Creating NTFS Hard Links in Windows XP

Jeff Wouters’s BlogMaking soft and symbolic links in Windows

Maxi-PediaMklink in Windows

Maxi-Pedia –  Difference between symbolic link and hard link


Print Friendly, PDF & Email
Share
06. February 2010 · Comments Off on Automate Zipping Tasks using the Command-line Interface · Categories: Batch Files, Command-line Tools, Windows · Tags: Archiving Tasks, batch files
Last updated on 02/05/2022

This guide demonstrates how to automate repetitive compression tasks using batch files with two popular free archiving tools, the command-line utility for IZArc (freeware) and the standalone console version of 7-Zip (7-Zip Extra: standalone console version). For using the WinRAR command-line tools, see this post.

compression icon

Automating compression tasks using batch files or other scripting languages makes it simple and fast to compress, copy, rename, and move files from the same folder(s) when it’s necessary to do so on a regular basis.

This guide covers the use of two free archiving utilities, the command-line add-on utility for IZArc and the standalone console version for 7-Zip. Using either of these utilities to automate archiving needs is fairly easy to do, costs nothing, and saves time. Although this guide is designed to enable the user to accomplish this task quickly and easily, it is assumed that the reader is already familiar with creating and using batch files and has some experience with using compression utilities. WinXP was used to verify the information in this guide.

Step 1. Download one of the following (32 bit versions were used for this guide)

The versions used for this guide were: 7-Zip ver 18.01 (2018-01-28) for Windows:, IZArc Version 4.1, and IZArc command-line Add-On Version 1.1.

Note: This guide uses the standalone console version of 7-Zip (7za.exe), which supports only the 7z, cab, zip, gzip, bzip2, Z and the tar formats, and unpacks Z, lzma, CAB formats. The full version of 7-Zip (installable and portable versions) contains a command-line executable (7z.exe) that supports additional formats and is explained in the 7-Zip help files. 

The IZArc command-line utility creates ZIP, CAB, LHA, BH, JAR, TAR, TGZ, and TBZ formats, and extracts ZIP, RAR, ARJ, CAB, LHA(LZH), ARC, ACE, GZIP, BZIP2, TAR (TGZ, TBZ2), UUE, ZOO, JAR formats. For IZArc, the command-line executables are izarcc for the compression function and izarce for the extraction function.

Step 2. Install the utility

For 7-Zip:
Extract the 7-Zip standalone console version to a location of your choice, e.g., C:\7zipCL or C:\Program Files\7zipCL.

For IZArc:
Extract the IZArc command-line Add-on to a location of your choice or to the default location (e.g., C:\Program Files\IZArc).

Step 3. Test the installation (optional)

Open a CMD window by hitting the Start button, enter “cmd” and press “OK”. Use cd to navigate to the 7-Zip and/or IZArc installation folders and execute the following:

For 7-Zip:
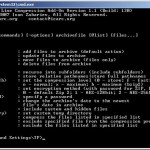
Type “7za” and then press ENTER. If working correctly, you should see the usage commands for 7-zip as shown in the top left thumbnail (click the picture to enlarge):

For IZArc:
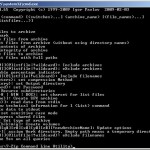
Type “izarcc” and then press ENTER. If working correctly, you should see the usage commands for IZArc as shown in the top right thumbnail (click the pictures to enlarge and view content):

Step 4. Create/modify batch file(s)

For the sake of simplicity and to focus on quickly demonstrating the use of these two compression utilities, this guide includes two simple example batch files (one for IZArc and another for 7Zip) that compresses all files from a folder into a single zip archive with a unique date suffix, moves the zip archive to another folder, and optionally deletes the original files. For both batch files, the folder “zipdir” contains the files to zip and the folder “movedir” is where the completed archives are moved.

Depending on which utility you wish to use, click one of the following links to open the batch file text in a new window where you can cut and paste it into your text editor or download it: testizarc.bat (IZArc) and/or test7zip.bat (7-Zip). Note: if you use either batch file be sure to:
remove “_.txt” from the file name to change the extension to .bat
– create the “zipdir” and “movedir” folders
– change paths as required in the script
– copy or move some files to be archived to the “zipdir” folder

Of course, either batch file can be modified to your own needs with a text editor, including changing the name or locations for the zip folder (zipdir) and move folder (movedir)

7za command for the 7-Zip batch file (test7zip.bat):

7za a -tzip "%movedir%\%myfolder%_%TODAY%.zip" -r "%zipdir%\*.*" -mx5
  • 7za – this starts the 7-Zip command-line executable.
  • a – command to add files to the archive.
  • -tzip – (optional) switch to set the type of archive. A zip file is the default compression format.
  • %movedir%\%myfolder%_%TODAY%.zip – the name of the archive to create.[“%movedir%” is the folder where the archive is to be created. “%TODAY%” is today’s date and time variable added to the zip archive name to insure a unique archive name is created each time the batch file is executed. The parentheses are optional unless there are spaces in the file path. Finally, “.zip” is the type of archive to be created.]
  • -r – (optional) recurse sub-directories
  • %zipdir%\*.* – the files and subdirs to be archived. Everything in folder “zipdir” (this includes any subfolders when using the -r switch).
  • -mx5 – (optional) switch to set compression method. In this case, it’s zip mode, compression level 5 (level 5 is normal compression which is the default level).

When using the zip format and normal compression, the optional switches can be eliminated and the command shortened as shown below:

7za a "%movedir%\%myfolder%_%TODAY%.zip" "%zipdir%\"

IZArc command for the IZArc batch file (testizarc.bat):

izarcc -a -r -p -cx "%movedir%\%myfolder%_%TODAY%.zip" "%zipdir%\*.*"
  • izarcc – starts the izarcc compression executable.
  • -a – adds files to the archive.
  • -r – (optional) recurses into subfolders (include subfolders)
  • -p – (optional) stores relative pathnames (maintains directory structure)
  • -cx – sets the compression level to maximum.
  • %movedir%\%myfolder%_%TODAY%.zip – the name of the archive to create.[“movedir” is the folder where the archive is to be created. %TODAY% is today’s date and time variable added to the zip archive name to insure that a unique archive name is created each time the batch file is executed. The parentheses are optional unless there are spaces in the file path. Finally, “.zip” is the type of archive to be created.]
  • %zipdir%\*.* – the files to be archived. In this case, it’s all the files in the folder ” zipdir” (this includes any subfolders using the “-r” command).

Currently, the IZArc help file for the IZArc program, IZArc.chm, contains limited information for the izarcc (compress) or izarce (extract) command-line functions; however, the command-line Add-on utility does include a text manual (manual.txt) that explains the commands and includes some examples for their use.

Optional switches can be eliminated and the command shortened as shown below:

izarcc -a -cx "%movedir%\%myfolder%_%TODAY%.zip" "%zipdir%\"

Using List files

Added 03/05/2013

List files are files that contain a list of one or more files and/or directories separated by new line symbols. Both the 7-Zip and IZArc command-line utilities can use list files for processing files and directories. 7-Zip uses UTF-8 encoding for list files by default, but the encoding can be changed at the command-line using the “-scs” switch if necessary (see the command-line version section in 7-zip.chm for further information).

The command-line syntax for compressing files and/or directories with a list file:

For 7-Zip:

7za a -tzip "C:\Your Folder\yourarchivename.zip @"C:\Your Folder\yourlistfile.txt"
  • 7za – the 7-Zip command-line executable.
  • a – add files to the archive command.
  • -tzip – set archive type to a zip file (optional unless using another compression format).

Note: Using list files with older versions of 7-Zip may be slow because 7-Zip will scan entire directories and/or drives of files and folders in the list file before archiving them. The issue is documented here.

For IZArc

izarcc -a -r -p -cx "C:\Your Folder\yourarchivename.zip @"C:\Your Folder\yourlistfile.txt"
  • izarcc –starts the izarcc compression executable.
  • -a – adds files to the archive.
  • -cx – sets the compression level to maximum.
  • -r – recurse into subfolders (include subfolders)
  • -p – store relative pathnames (maintains directory structure)

Examples for a list file and a batch file to illustrate using a list file with the 7-Zip and IZArc command-line utilities are below. The batch file contains commands for both utilities using a single list file. Be sure to change the file and path names as appropriate for your situation and the batch file extension to bat before using:

zip_listfile.bat

mylistfile

Summary

It’s fairly easy to automate archiving tasks using a simple batch file using either of the two free utilities covered in this guide. For basic needs, the command-line utility for IZArc or the 7-Zip standalone console version (7za.exe) should suffice. For more complex requirements, the full version of 7-Zip (7z.exe) contains additional features for more sophisticated archiving tasks from the command-line.

For more information and examples for using the 7-Zip command-line, also see the following:

Dot Net Perl’s article, 7-Zip Command-line examples

Codejacked’s article, ZIP Up Files from the command-line

The official 7-Zip Manual, 7ZIP manual & documentation


Print Friendly, PDF & Email
Share
19. December 2009 · Comments Off on Recovering from an Accidental Partial Format of an External USB Drive · Categories: Linux, Windows · Tags: Data Recovery, Windows
Last updated on 11/13/2023

If you ever accidentally formatted an external drive on a PC with several plugged-in USB devices, you probably remember seeing them listed in the formatting tool’s selection box. The (C:) and (D:) drives may be listed, which are usually the boot drive and the backup drive. If an (E:) is displayed, it’s probably the optical drive. However, distinguishing between the other drives or devices may not be as apparent, especially when information beyond the drive letter assignment isn’t shown. This is particularly true for drives or other USB  devices that don’t have identifying information on them. Under these conditions, it’s easy to become careless or impatient and select the wrong drive; especially if its letter assignment appears to be correct. If you are unlucky, you may notice a flashing light on the device confirming that the wrong drive is being formatted.

mystica_USB_Flash_Drive (public domain clip art www.clker.com)

I did this recently when in a hurry and chose the wrong drive letter. Instead of formatting the flash drive, the external 250GB backup drive was formatting. Panicking, I immediately realized the error and stopped the formatting process – but it was too late. Checking the hard drive, I found it couldn’t be accessed. The drive letter was still visible in Windows, but no files or folders were displayed and nothing could be written to or read from the drive.

Fearful of losing the data, I tried several file recovery tools with no success until using TestDisk. TestDisk is a free (open source) data recovery tool available from CGSecurity. With TestDisk, I was able to successfully restore the drive’s partition and it worked normally.

Luckily, all of the data was still intact. That’s because during a high-level format (quick format), only the external drive’s partition table information or boot sector are erased. According to Windows Help Central, even a full format can be recovered pretty easily as long as the original files are not overwritten with new data. That’s because the spaces containing file information on the disk drive are not really wiped clean, but instead, the areas where files are stored are marked as available for new data. As long as no new data is written to the drive, chances are excellent that the data is 100% recoverable using simple freeware data recovery tools. That’s because if you hosed the partition table or MBR (Master Boot Record) during the format process, the drive isn’t likely to be writable anyway.

TestDisk is a utility that can be used to restore corrupted and missing MBRs, partition tables, and data. TestDisk works on most operating systems including Windows, Linux, BSD, SunOS, and Mac OSX and it’s included with many Linux LiveCD distros such as PartedMagic and many others. It’s a very useful and sophisticated tool in the hands of experienced users. Unfortunately, because data recovery can be a complex issue, inexperienced users may find it “user unfriendly”. However, documentation for the program is thorough and one can find many examples, technical notes, and step by step instructions in the documentation section on TestDisk’s Wiki. Also, the TestDisk Step by Step guide contains plenty of screen-shots which greatly helps in the data recovery process.

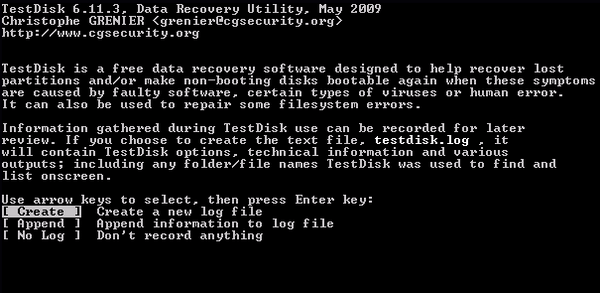
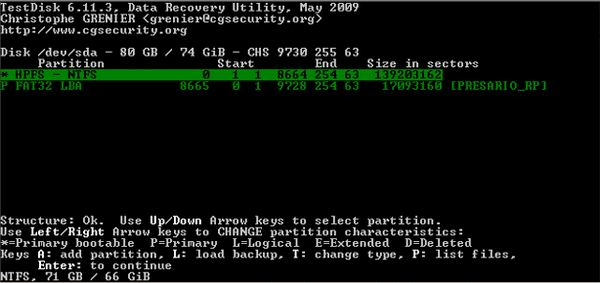
The following screen-shots show what to expect after starting TestDisk for recovering a deleted partition (note: the screens below show the results for a working hard drive that doesn’t have any problems).


Above is the first screen. For most cases,  select the default option – Create a new log file.


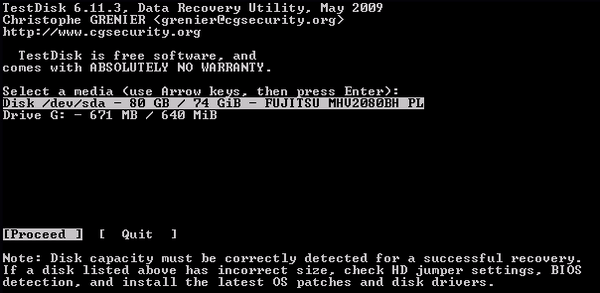
Next, select your media device with the problem. In the screen above, the main hard drive is selected.


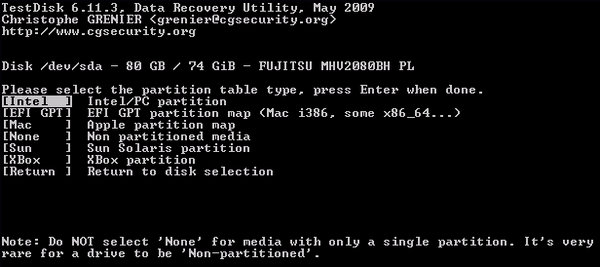
Select Intel if using a Windows or Linux machine.


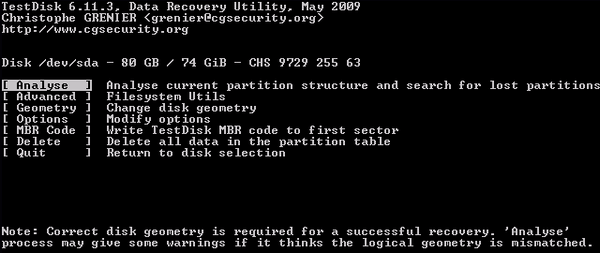
In most cases “analyse” should be selected.

FYI, “Advanced” provides options to restore the boot sector or to create images for partitions.

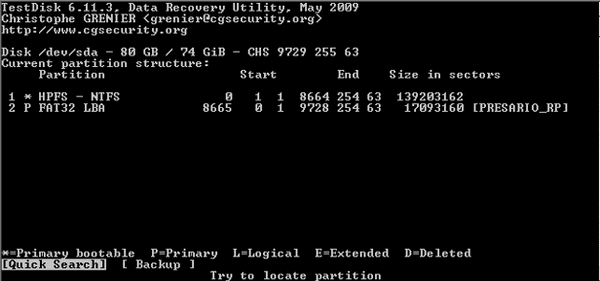
analyse
Analyses displays a preliminary list of the current partitions for the drive selected. Next, select Quick Search to continue searching for additional partitions.

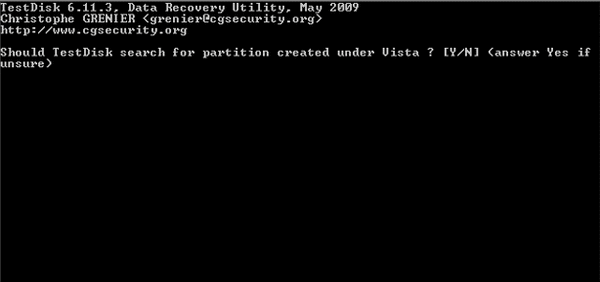
quicksearch
“Yes” should be selected for most situations.

selectpartition
TestDisk displays the structure analysis results and displays the partitions. Healthy partitions will be highlighted in green. Here, you can use the up/down arrow keys to select a partition to further analyze or recover, then hit ENTER. 

Pressing “P” will list the files in the partition, which can provide some assurance that the data is still intact. Do not use the left/right keys – they are used to change the partition’s characteristics!

deepersearch

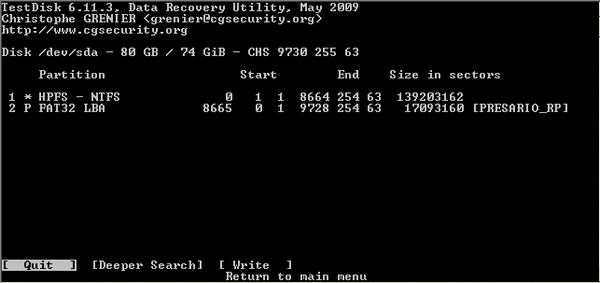
If the partition you want to restore is listed, select “Write” and then Enter to restore it and that should be it. If TestDisk didn’t find your partition, you have the option to perform a deeper search by selecting “Deeper Search”. In the screenshot above, the results show that no problems were found (the screenshots are for a working hard drive).

For more information, the TestDisk Wiki’s Step by Step instructions explain the recovery procedure well enough so that even novices shouldn’t have a problem.

—————————————————————————————————————————————————————————

Other TestDisk how-tos:

The How-to-Geek explains recovering partitions with TestDisk using an Ubuntu LiveCD (ver 9.10):

Recover Data Like a Forensics Expert Using an Ubuntu Live CD

A MakeTechEasier how-to for data and partition recovery using TestDisk:

How to Recover Data and Partitions for Free with TestDisk

Other Data Recovery Utilities

If the drive is still accessible or if only a few files are missing, you may want to try one of the easier-to-use file recovery programs listed below before trying TestDisk. Some that I’ve successfully used in the past to recover lost data are:

Recuva

Restoration

PhotoRec

Install or Recover MBR or Boot Sector

If you know the problem is a damaged or missing MBR (Master Boot Record), a number of tools can be used to repair or restore it – including TestDisk.

MBR Recovery:

Write a new MBR with TestDisk:
  1. Start TestDisk
  2. Create a new logfile
  3. Select a media
  4. Select partition table type (Intel, Mac, Sun, etc)
  5. MBR code (this writes a new MBR)

Below are are other tools and resources that can be used to install, repair or restore the MBR. Note that some of the tools listed require that a backup of the MBR was previously saved:

Bootice (restores a saved MBR only)

How to fix MBR in Windows XP and Vista

5 Free Tools to Backup and Restore Master Boot Record (MBR)

MBR, Partition Table and Boot Record Tools

Boot Sector Recovery:

A Sourceforge article describes the procedure for recovering a Boot sector using TestDisk to successfully fix a dual-boot PC (WinXP & Ubuntu) that wouldn’t boot. The procedure is as follows:

Boot Problems:Boot Sector (follow the steps in the either case section for TestDisk as shown below)

  • 1st screen: select No Log and then press ENTER
  • 2nd screen: select the drive to restore and select Proceed
  • 3rd screen: select Intel
  • 4th screen: select Advanced
  • 5th screen: select the partition and select Boot
  • 6th screen: select Rebuild BS
  • 7th screen: type “Y” to confirm

If using the Grub bootloader for a dual-boot system, make sure to update Grub (it may be necessary to use a LiveCD of your Linux distribution to do this).

Summary

If the easier-to-use tools above don’t work for whatever reason, give TestDisk a try to recover the partition, MBR or boot sector, but follow the directions carefully. Although fairly simple, it’s still possible to mess things up so thoroughly that the only way to recover the data would be to send the drive to a very expensive professional data recovery service.

Remember, if you accidentally format or erase files from your external USB drive, don’t panic. Get to work on recovering your data because chances are that it can be accomplished more easily than you think.


Print Friendly, PDF & Email
Share
guidelines
privacy
">Bear

Bad Behavior has blocked 2009 access attempts in the last 7 days.

Private
address