Automate saving web images to a specified folder by copying image URLs to the clipboard using an AutoHotKey (AHK) script. Usually, the process to save a web image from a browser consists of: (1) right-click the image, (2) select “save picture as”, and (3) navigate to the folder to save the image. While usually acceptable for single images, this process can can be slow and tedious for multiple images.
AutoHotKey and Wget need to be installed for the script to work. The version of Wget used for this guide was wget-1.19.1_curl-7.52.1_win32_win64.7z, a portable package with Curl that includes the 32-bit and 64-bit versions of Wget, a ca certificate, localization, and a manual. The latest Wget windows binaries may also be downloaded from eternallybored.org.
The script was tested on a 32-bit version of Windows XP, using portable versions of AutoHotKey and Wget. The only modification needed for a portable installation of Wget is to set the path for the wget or wget64 executables in the script. The script will work without modification if Wget and AutoHotKey are already installed and the paths for AHK and Wget were set by the installer. Paths can be checked with the “set” command from a windows prompt, or by using Control Panel -> System -> Advanced Tab -> Environment Variables -> System Variables -> Path.
AHK Script Download
(Click to view, or right-click and use “save Link Target as” to download):
Setup Before using, enter the path to the wget or wget64 executable in the script if wget is not in the system path. Optionally, enter a full path to an icon file for the script. Also, the extension of the script must be changed from txt to ahk.
How to Use
Start the script with a double-click
Enter or paste an existing folder path to save downloaded images and click OK. If no path is entered the default path will be the same folder as the script.
Right click an image in your web browser and select “Copy image URL”
A cmd window opens and displays downloading progress. It closes after the download is completed
The image URL and date are appended to photolog.csv in the specified folder
All characters after jpg. jpeg, gif, or png are removed from the URL before downloading
URLs that don’t include the jpg, jpeg, gif, or png extensions are ignored
To change folders, reload the script and enter a new existing folder path
Context menu tools such as FilemenuTools may be used to start the script and set the download folder automatically from any location.
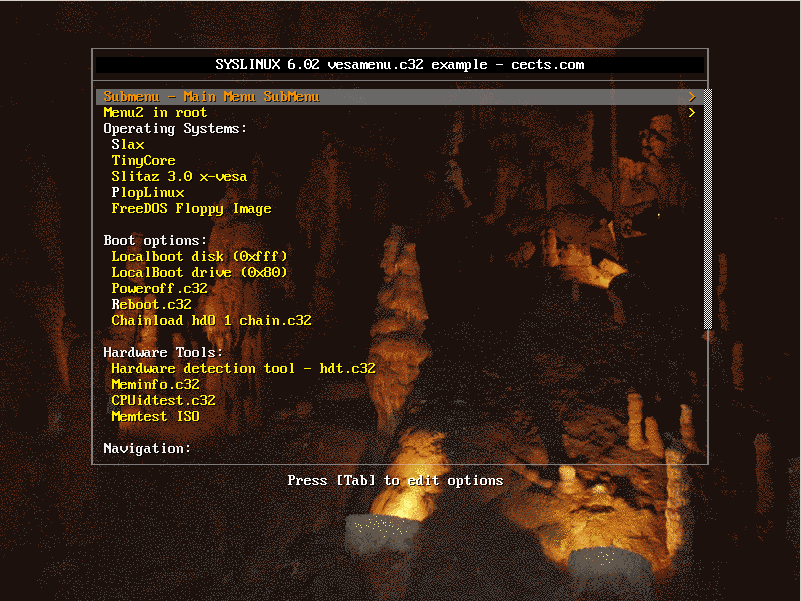
This guide provides everything needed to create a customizable multi-boot USB flash drive in Windows with high resolution menus and customized splash screens. It provides a framework for creating a basic but functional multi-boot flash drive using Syslinux 6.xx as the primary bootloader. Basic menu configuration files and splash screen examples are provided. Experienced users shouldn’t find it difficult to follow this guide to create a ready-to-use bootable flash drive that can be customized to their needs. Users should already have some familiarity with Syslinux, installing Linux distros, and with formatting and partitioning flash drives.
Syslinux provides two menu systems, the Simple Menu System and the Advanced Menu System. The advanced system must be compiled while the simple system includes the ready-to-use vesamenu.c32 and menu.c32 modules. This guide uses the vesamenu.c32 module.
Splash Screen Resolutions
Syslinux 6.xx can use splash screens in the .png or jpg formats at resolutions from 640×480 up to whatever is supported by the system. If the flash drive is going to be used on multiple systems, it would be best to use a typical resolution such as 800×600 that would work across most systems.
Modules
Since version 5.xx, modules are no longer stand alone or need additional libraries to work. A description of the changes can be found on the Syslinux Wiki at https://www.syslinux.org/wiki/index.php/Library_modules. In most cases, Syslinux will alert you of any additional libraries required when you try to use them.
(U)EFI (Unified/Extensible Firmware Interface)
Although there has been a lot of hype about (U)EFI (Unified/Extensible Firmware Interface) in general and support for (U)EFI began with Syslinux 6.xx, the (U)EFI modules are still fairly new, have a number of unresolved issues, and are not widely used at this time. UEFI in Syslinux is buggy and has problems on both Windows and Linux. Arch Linux describes some of the more relevant ones at https://wiki.archlinux.org/index.php/syslinux#Limitations_of_UEFI_Syslinux. Some of the issues with UEFI are:
UEFI Syslinux does not support chainloading other EFI applications like UEFI Shell or Windows Boot Manager.
UEFI Syslinux does not boot in Virtual Machines like QEMU/OVMF or VirtualBox or VMware and in some UEFI emulation environments like DUET.
Memdisk is not available for UEFI.
UEFI Syslinux application syslinux.efi cannot be signed by sbsign (from sbsigntool) for UEFI Secure Boot.
Using TAB to edit kernel parameters in UEFI Syslinux menu leads to garbaged display (text on top of one-another).
Other Syslinux issues/limitations:
Using Syslinux 6.02 on BTRFS volumes corrupts the superblock.
Syslinux cannot access files from partitions other than its own.
Using the memdisk module to boot most ISOs is often difficult or impossible.
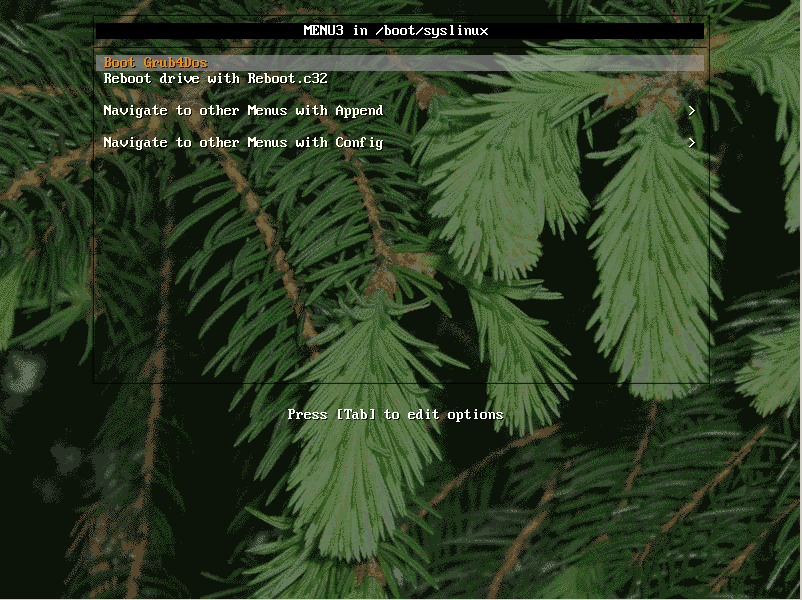
Syslinux.org has admitted to these limitations and has often recommended other bootloaders such as GRUB, Grub4Dos, or Plop Boot Manager to compliment Syslinux. In spite of this, Syslinux remains one of the most functional and popular bootloaders not only for flash drives, but for other bootable devices like CDs, for most operating systems, and for chainloading partitions and hard drives. It’s very flexible and is an excellent choice as the primary bootloader for most situations. And by adding another bootloader such as Grub4Dos, this greatly enhances the flash drive’s booting options.
Creating a Multi-boot Flash Drive steps:
Format the flash drive
Install Syslinux 6.xx
Install modules and files
Install or create splash screens
Customize menu configuration files (optional)
1. Format the Flash Drive
Format the flash drive with FAT16 or FAT32.
2. Install Syslinux 6.xx
Download and unzip the latest .zip version of Syslinux 6.xx from Kernel.org. The file size should be about 12mB before unzipping. Open a cmd window and cd to C:\syslinux-6.xx\bios\win32. Type the following to install Syslinux to the flash drive where x is your flash drive:
syslinux.exe -sfma x:
This installs ldlinux.c32 and ldlinux.sys to the flash drive.
3. Install Modules and Files
Modules
Look for and copy the BIOS versions of the modules shown in the directory tree for the root of the flash drive. An easy way to locate the modules is to use something like AgentRansack. Modules have a .c32 extension (except memdisk) and are located in various folders in the C:\syslinux-6.xx\bios\com32 directory or C:\syslinux-6.xx\bios directory (for memdisk). Place all of the modules in the root directory of your flash drive. Copy the following modules:
The help text, menu.cfg, syslinux.cfg and other configuration files required can be downloaded from the configfiles download link below. Right click and using “save target link as” or similar (depending on your browser) to download it and then unzip and extract its files to the root of the flash drive.
Download the latest version of Grub4Dos from grub4dos-chenall. Extract the grub.exe and menu.lst files to the root of the flash drive.
4. Install or Create Splash Screens
Install ready-made Splash Screens
To get started, splash screens tested to work with the configuration files are provided below. Just unzip them to the splashimages folder. After installing the splash screen images, the flash drive is ready to test or use.
Nine (9) splashscreen files are provided. Download them as an album and extract to the splashimages folder. Slightly change the filenames by removing the number and dash so the filenames match those used in the menu configuration files.
The correct splashscreen filenames are:
cave_800x600_14.png
fallleaf_800x600_14.png
grassyhill_800x600_14.jpg
mist_800x600_14.png
nightlight_800x600_24.jpg
ny_800x600_14.jpg
road_800x600_14.png
Spruce_800x600_14.png
winter_800x600_14.jpg.
The link below displays a directory of what the flash drive contents should look like at this point:
Create and Install Customized Splash Screens (optional)
To create your own menu graphics, use the batch file below or another graphics program to create .png or .jpg format splash screens from your image files. Since the menus are already configured with light text, you may want to use a dark color to start off with. Generally, 14 colors works nearly every time and renders more quickly.
The batch file below is configured to use ImageMagick portable installed to the Utilities folder. If ImageMagick is already installed, simply change the line set IMdir=C:\Utilities\ImageMagick\ to your ImageMagick location. Use double quotes if the path contains spaces (e.g., set “IMdir=C:\Program Files\ImageMagick\”). Be sure to use the latest version of ImageMagick since the newest version has improved image conversion options and processing.
If creating a customized splash screen, place it in the splashimages folder in the flash drive and change the file name in the appropriate menu configuration file(s) as below so it can be used on the next boot:
MENU BACKGROUND /splashimages/your image name.jpg
5. Customize Menu Configuration Files (optional)
After the flash drive is working properly, try to install bootable applications or Linux distros by modifying the boot options in the menu configuration files for Syslinux or in menu.lst for Grub4Dos. Some menu label entries are already provided in the Syslinux menus that were verified to work such as Slax, Grub4Dos, and a few others.
That’s it. If anything gets messed up, everything can just be reinstalled and started again from the beginning. Good luck.
This guide demonstrates how to quickly and easily create custom 640×480 splash images for Grub4Dos, GRUB, and Syslinux menus using the Windows version of ImageMagick. The information in this guide was tested with Grub4Dos ver 0.4.4, GRUB ver 0.97, and Syslinux ver 4.04. Both of these Grub4Dos and GRUB versions have nearly the same requirements for splash images so that the same images can be used by either one. The formats are xpm for GRUB/Grub4Dos and png/jpg for Syslinux.
This guide does not cover splash images for GRUB2, the newest version and replacement for GRUB, which only recognizes the .tga, .jpeg, and .png image formats. GRUB is now officially known as GRUB Legacy, and while no longer developed as of version 0.9x, it is still being supported and enhanced, so GRUB will continue to remain a very usable boot-loader for the immediate future. Syslinux graphical menus are generated using the vesamenu.c32 module, which must be included in the boot medium. Syslinux Hi-color menus, like GRUB and Grub4Dos menus, also use a 640×480 size splash image, but have slightly different requirements as explained below. Also, Grub4Dos and GRUB have some splash screen requirements that are not specified in the Syslinux documentation, so apparently those particular graphical attributes are either not applicable or have no limitations in Syslinux.
This is a quick and dirty method that was tested to work as specified for this guide. The aim of this guide is to quickly generate custom splash images from existing images rather than to create works of art. As such, the quality of the finished images largely depends on the initial quality and size of the original image files.
The requirements for Grub4Dos or GRUB splash screen images are:
The image must use the .xpm format (.xpm files are usually g-zipped for faster loading).
The image must be exactly 640×480 pixels in size.
The image can’t have more than 14 colors.
The requirements for Syslinux Hi-color splash screen images are:
The image must be in the .png or .jpg format.
The image must be exactly 640×480 pixels in size.
Image depth and number of colors requirements appear to be unspecified. For this guide, the depth is set to 16 bits and the number of colors is set to 14 in the ImageMagick convert command line to obtain a smaller file size. For some images, the user may wish to increase the number of colors for better quality results.
Tools: In Windows, the only tools required to create splash images are the ImageMagick freeware graphical image suite and a text editor to create batch files such as notepad. ImageMagick is a command-line only tool that’s fairly easy to use. As a command-line application, commands are executable from batch files or with other scripting languages. The self-installing version of ImageMagick automatically sets the registry entries, making it possible to execute it from any directory. If using the portable version, the path variable needs to be set manually or specified in a batch file to achieve this functionality. ImageMagick portable for Windows, ImageMagick-6.7.4-Q16-windows.zip, was used for this guide and tested on PCs running Vista and WinXP.
Image files to convert: In most cases, make sure images are in the .bmp, .jpg, or .png format and are 640×480 pixels in size or have the same aspect ratio (e.g. 800×600, 1024×768, etc.) before converting them. If images are in any other format or don’t have a 640×480 aspect ratio, re-size them and change the format to .bmp, .jpg, or .png before using ImageMagick. For Grub4Dos or GRUB boot menu screens, if another original image format is used, such as .gif, ImageMagick will process it without error, but the image may be distorted or render incorrectly. Files can easily be re-sized and converted to .bmp, .jpg, or .png formats using most graphical editing programs already on your computer. Note that the .png format usually results in a slightly smaller file size than the .bmp format. Note: ImageMagick’s resize operator is designed to produce the best possible result for the requested image size (i.e. 640×480) and ignores aspect ratio if image distortion occurs during the conversion process. Thus the re-size operator does not necessarily scale the image! That is why it’s important to use true 640×480 pixel images (or images with the same aspect ratio (e.g. 4:3) before converting them with ImageMagick. Make sure to verify image size after converting with ImageMagick. The final size of images must be exactly 640×480 to work as splash screens. ______________________________________________________________________________
Steps to Create Grub4Dos and GRUB Compatible Splash Images:
Step 1: Download and Install ImageMagick
Step 2: Convert Image Files into Grub4Dos or GRUB Compatible Images with the ImageMagick command line:
Open a command window in Windows by clicking the Start button, select RUN…, then type “cmd” and click the “OK” button. In the command window, navigate to the directory where the files are located and use the following command to convert each file to a Grub4Dos and GRUB compatible splash image:
To install a Grub4Dos or GRUB splash image in menu.lst:
Copy the splash image to your HDD (e.g. hdo, hd1, etc.) or USB (e.g. sda1, sdb2, etc.) in the default folder or in a folder of your choice
Edit the menu.lst file to reflect the location of the splash image:
splashimage (hd0,0)/yourfolder/filename.xpm.gz
Batch file example:
Drag and drop single or multiple .bmp, .jpg, or .png images into the batch file to automatically convert them into GRUB or Grub4Dos compatible splash screen images. Click to open the file link in your browser and then cut and paste the code into a text editor or right click to download the batch file code. Be sure to change the file extension to .bat before using:
convert_grub_rev3a.bat (updated script with more options) _________________________________________________________________________
Steps to Create Syslinux Compatible Splash Images:
Step 1: Download and Install ImageMagick
Step 2: Convert Image Files into Syslinux Compatible Images using the ImageMagick command line:
Open a command window in Windows by clicking the Start button, select RUN…, then type “cmd” and click the “OK” button. In the command window, navigate to the directory where the files are located and use the following command to convert each file to a Syslinux compatible splash image:
Note: Increasing colors from 14 to a higher value in the above command can result in higher quality images, but also slightly increases the file size.
To install a Syslinux splash image:
Make sure the vesamenu.c32 module is installed to the boot medium (get it from the Syslinux com32\modules\ folder). Vesamenu.c32 is usually placed in the same folder or partition as the syslinux.cfg file.
Copy the splash image to your HDD (e.g. hdo, hd1, etc.) or USB (e.g. sda1, sdb2, etc.) in the default folder or in a folder of your choice
Edit the syslinux.cfg file to reflect the location of the splash image:
MENU BACKGROUND /yourfolder/yourfile.png
Batch file example:
Drag and drop single or multiple .bmp, .jpg, or .png images into the batch file to automatically convert them into Syslinux compatible splash screen images. Click to open the file link in your browser and then cut and paste the code into a text editor or right click the link to download the batch file code. Be sure to change the file extension to .bat before using:
 wget photos cects.txt (3.1 KiB, 2,425 hits)