This guide illustrates how to manually create a multi-boot multi-partition USB drive using both SYSLINUX and GRUB4DOS. Because many apps and Linux distros are coded and/or organized in a way intended to operate from dedicated single partition USB drives, they are often notoriously difficult to boot from multi-boot USBs. Thus, while many apps and distros state they are bootable from USBs, often this means they are bootable from single-purpose (and single partition) USB drives, often using UNetbootin or similar utilities. Seldom, if ever, are directions provided for installation to an existing multi-boot environment, or how to create a multi-boot USB in the first place. To get around this limitation, this guide demonstrates how to setup a USB drive to enable booting several apps and distros from a single partition and from multiple dedicated partitions.
Almost any distro or app can be made to boot from a USB, with some being easier than others. Sometimes it’s as easy as extracting files and folders from a zip file to the USB and installing a boot-loader. However, more often it’s not always so simple; especially when attempting to install apps or distros to a partition already cluttered with multiple ISOs, image files, compressed files, system files, configuration files and various folders. For the sake of brevity and simplicity, this guide covers selected apps and distros that were tested to work. By following this guide, it should become apparent how to install other apps and distros or updated versions of those that are included here.
For this guide, SYSLINUX is used as the primary boot loader. GRUB4DOS is used as a secondary boot-loader to chainload partitions (Chain-loading is a process where control passes from the boot manager to the boot sector) and to boot ISOs and other apps in the active partition. In this case, GRUB4DOS is used to pass control (chainload) to Syslinux installed on the dedicated partitions’ boot sectors (except for the active partition, which is directly booted with SYSLINUX). The advantage of GRUB4DOS is that currently, it’s MUCH easier to chainload partitions and to boot ISOs using GRUB4DOS than with SYSLINUX, which is really designed to chainload hard drive partitions rather than USB drive partitions. Also, some applications (like ISOs) can boot easily with GRUB (or GRUB4DOS), but not always with SYSLINUX. Usually, anything that will boot with GRUB can also boot with GRUB4DOS, as long as it’s installed to a FAT formatted partition (either FAT16 or FAT32). It’s also important to note that Syslinux is limited in that it can’t access files outside of its own partition. However, when GRUB4DOS and SYSLINUX are used together, this greatly expands the booting options for USB drives. So essentially, as used here, GRUB4DOS is used to boot ISOs and a few other apps on the active partition and to control (chainload) dedicated partitions containing a single app or distro. Once control is passed from GRUB4DOS, the dedicated partition automatically boots the application or app with SYSLINUX, which is installed to the partition’s boot sector.
It’s important to note that all the applications and distros installed to the dedicated partitions for this guide are already designed to boot with SYSLINUX, so all that’s necessary is to copy their files to a partition, install SYSLINUX to the partition’s boot sector, and setup GRUB4DOS to boot the partition in order to use the SYSLINUX default menu options included in the syslinux.cfg files. Using SYSLINUX to automatically boot dedicated partitions provides the advantage of being able to use the boot options in the default syslinux.cfg files that otherwise wouldn’t be available using a single boot-loader and without manually creating, editing and maintaining complex and excessively large syslinux.cfg and/or menu.lst files.
This guide is an extension of an earlier one, Booting DSL (Damn Small Linux) from a Multiboot USB Drive, which demonstrated how to add DSL to a working bootable (either single or multi-boot) single partition USB drive with SYSLINUX. Although creating multi-boot USBs can be accomplished in many other ways, after much trial and error, the method here may be one of the easier ways to boot several popular distros and apps from the same partition and/or from multiple partitions for USB drives. This guide assumes the user has some experience with booting external devices, using partitioning tools, creating Live CDs from ISOs, and has a basic knowledge of Linux, SYSLINUX, and GRUB4DOS.
____________________________________________________________________________________
Operating Systems:
- Windows 98/XP/Vista/Win7
- Parted Magic LiveCD (PM ver 4.7 used for this guide)
Boot-loader and partitioning utilities to download. Extract to “C:” or another location of your choice on a Windows computer.
- GRUB4DOS (ver 4.4 used for this guide, new versions from grub4dos-chenall should also be OK)
- SYSLINUX (ver 3.84 used for this guide, ver 3.86 also tested OK, but higher versions such as 4.02 may be incompatible with the distros and app versions used for this guide)
Note: The SYSLINUX version used to boot partitions must be compatible with any SYSLINUX module files included with the app or distro. That is why versions are provided — to insure compatibility. For instance, if you want to install a more recent version of Parted Magic to the USB and it contains an upgraded vesamenu.c32 module and you are using a previous version of SYSLINUX that doesn’t support that change; then you may not be able to boot the USB unless you also upgrade SYSLINUX to a compatible version .
Tested distros and applications used for this guide (download links are provided below in the article body):
Partition 1 (Device boot partition)
Puppy Linux ver 4.31 (booted directly with SYSLINUX)
SuperGrubDisk ver 0.9799 (booted directly with GRUB4DOS)
WinME Non-Windows Based Image File W/ImageApp (booted directly with either SYSLINUX or GRUB4DOS)
Partition 2 (dedicated – primary)
DSL (Damn Small Linux) ver 4.4.10-embedded (chainload boot with SYSLINUX from GRUB4DOS)
Partition 3 (dedicated – primary)
Parted Magic LiveUSB ver 4.7 (chainload boot with SYSLINUX from GRUB4DOS)
Partition 5 (dedicated – logical)
AVG Rescue USB ver 90-100429 (chainload boot with SYSLINUX from GRUB4DOS)
Partition 6 (dedicated – logical)
Clonezilla Live (for USB – zip file) ver 1.2.4-28-486 (chainload boot with SYSLINUX from GRUB4DOS)
Note: If versions other than those shown above are used, the USB’s syslinux.cfg and/or menu.lst files, as well as Syslinux itself, may need to be updated to reflect this change and to boot correctly.
Hint: Downloading the above distros and apps to another USB drive, an external HD, or burning them to a CD will ease the task of copying and extracting them to the USB partitions later in this guide.
Text (*.txt) versions of the configuration files for SYSLINUX and GRUB4DOS are pre-configured and provided in this guide. Included are:
- syslinux.cfg (syslinuxcfg.txt)
- menu.lst (menulst.txt)
- submenu.lst (submenulst.txt)
- help.txt (help.txt)
_____________________________________________________________________________________
Here are the steps to follow to create a multi-boot and multi-partition USB drive:
About Partitioning and Formatting
First, decide on the number and size of the partitions needed to hold everything to be installed. Although not covered in this guide, it’s often a good idea to have at least a couple of extra partitions and some unallocated space for future expansion and for apps that are to be booted from dedicated partitions (to utilize multiple boot options). Note that any storage drive device is limited to a maximum of four primary partitions. To partition a drive with more than four partitions, it’s necessary to create at least one as an extended partition and to create one or more logical ones within that extended partition. More often than not, it’s possible to boot several apps and distros (especially ISOs) from the same partition (particularly the active partition), so sometimes it’s desirable to create a large active partition to hold several booted apps and some smaller ones just large enough to hold the apps or distros that require their own partitions. For simplicity, this guide uses a 2GB USB drive divided into five approximately equal primary partitions (3 primary, 2 logical) of about 400MB each. The first partition will boot multiple distros and apps, with the other four setup as dedicated partitions (booting a single app or distro).
1. Boot the PC with the Parted Magic LiveCD and use GParted to Partition the USB drive
a. Connect the USB drive and boot the computer using the Parted Magic LiveCD. In Parted Magic, start the GParted Partition utility and set it to display the USB drive.
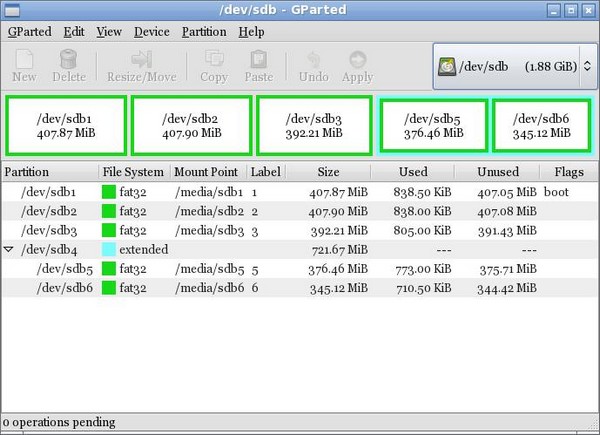
b. Use GParted to create three 400MB primary partitions and two 400MB logical partitions in an extended partition of 800MB. Be sure to format the partitions with FAT16 or FAT32 (It’s recommended to use either FAT16 or FAT32, but do not use both) and set the boot flag for the first partition. You can also provide identities for the partitions using labels. See the example GParted image below which uses three primary partitions and one extended partition. The partitions are labeled as 1, 2, 3, 5 & 6 (4 is the extended partition holding logical partitions 5 & 6. Partition 4 itself isn’t writable). Make sure no errors are showing for any partition before moving to the next step.
For step 2, Parted Magic can continue to be used; however, users may find tasks such as copying, moving and extracting files somewhat easier using a more familiar Linux distro such as Ubuntu, Puppy, etc. Parted Magic is suggested for steps 1 to 3 because it contains GParted, SYSLINUX, a file manager and LXTerminal all in one package, which are all used in this guide. In any case, a non-Windows environment such as Linux must be used to copy the files to all the partitions (except the boot partition) since Windows is only able to access the bootable (active) partition of USB drives.
2. Using Parted Magic or another Linux Distro, install Applications and Distributions
Note: The file ldlinux.sys shown in each of the following screen-shots will not exist until steps 3 and 4 are completed.
Partition #2 – DSL (Damn Small Linux)
DSL can be booted two ways: (1) from it’s own partition, or (2) co-existing with other apps and distros on the same partition. This guide will boot DSL from its own partition (first method), using the default DSL syslinux.cfg file that comes with DSL which provides multiple booting options. The other method, installing DSL to co-exist with other apps and distros in a single boot partition (second method) was covered in a previous article: Booting DSL (Damn Small Linux) from a Multiboot USB Drive.
a. Download DSL Embedded. Ver 4.4.10-embedded used for this guide.
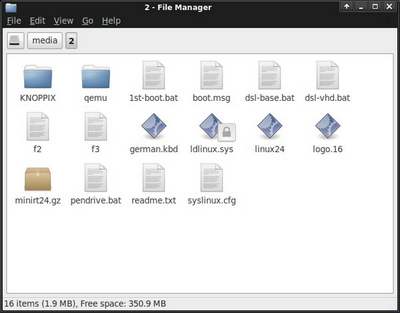
b. Extract DSL Embedded to Partition #2 and copy all the files in the main folder to the root of the partition (erase the original folder afterward). The root of the partition should look like this:
Partition #3 – Parted Magic
a. Download Parted Magic LiveUSB. Ver 4.7 used for this guide.
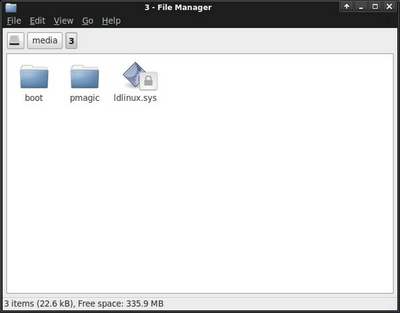
b. Extract to partition #3 and place the two folders, pmagic and boot in the root of the partition (erase the original folder(s) afterwords). The root of the partition should look like this:
Note: Parted Magic is in it’s own partition to avoid boot conflicts. Parted Magic, like the other distros and apps installed to dedicated partitions, already comes with a customized syslinux.cfg file. Parted Magic’s syslinux.cfg file is located in the boot folder (DSL’s and AVG’s syslinux.cfg file are located in root, and Clonzilla’s is located in the syslinux folder). During the booting process, SYSLINUX automatically searches for the syslinux.cfg file in the following order:
/boot/syslinux/syslinux.cfg
/syslinux/syslinux.cfg
/syslinux.cfg
Note: The boot order above shows why Parted Magic and many other distros and apps should be placed in their own partitions. Should another syslinux.cfg file be placed in root, it would be ignored and the Parted Magic syslinux.cfg file would always load since “boot/syslinux/syslinux.cfg” is first in the boot order. Of course, there are ways to get around this, but the goal of this guide is to create a multi-boot USB quickly and easily without modification to the original file contents and structure so that the default boot options for the installed apps and distros are used.
Partition #5 – AVG Rescue CD
a. Download AVG Rescue (for USB Stick). Ver 90-100429 used for this guide (avg_arl_cd_en_90_100429.zip).
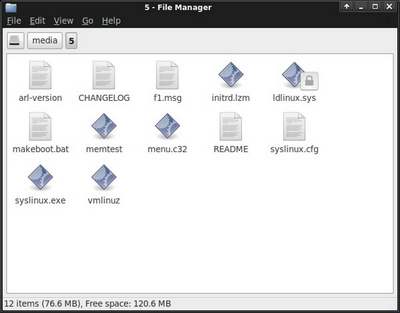
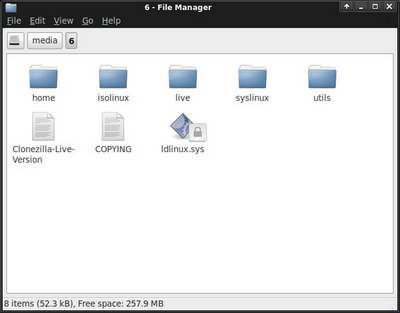
b. Extract to Partition #5. The root of the partition should look like this:
Partition #6 – Clonezilla
a. Download Clonezilla Live (for USB – choose the zip file). Ver 1.2.4-28-486 used for this guide.
b. Extract to Partition #6. The root of the partition should look like this:
Partition #1 – Puppy Linux/SuperGrubDisk/WinME Boot Image/Anything else
a. If you have a working frugal installation of Puppy Linux Ver 4.31 copy all of its files to a folder named “puppy”. The minimum files required for a frugal install of puppy 4.31 to a USB are: initrd, pup_431.sfs, usbflash, and vmlinuz.
b. Download SuperGrubDisk ISO (ver 0.9799) and place the ISO in a folder named “sdg” (yes, “sdg” is correct).
c. Download WinME Non-Windows Based Image File W/ImageApp and extract it to its default folder “winmec”.
d. Try other programs of your own.
Note: Not all ISOs are bootable using GRUB4DOS. Often, identifying bootable ISOs is a trial and error process using various boot options to determine whether it’s possible to do so without modifying the ISO image. All the ISOs used in this guide were tested to insure they were bootable without modification.
Click here for the screen-shot of Partition #1, or scroll further down this page
3. In Parted Magic, install SYSLINUX to Partition Boot Sectors
Note: another excellent tool to perform steps 3 and 4 is Bootice V0.8.2010.1228, which operates in Windows and can access multiple partitions. It can analyze partitions, format the USB drive, install and restore MBRs and PBRs, and more. Bootice is fairly easy to use; see Easily Modify Boot Sectors with Bootice for more information.
In Parted Magic, open a LXTerminal window and type the following commands to install SYSLINUX to all partition boot sectors except for the boot partition (partition #1). Be sure to substitute your USB device in place of sdb(x). Press ENTER after each of the following commands:
syslinux –install /dev/sdb2
syslinux –install /dev/sdb3
syslinux –install /dev/sdb5
syslinux –install /dev/sdb6
Exit Parted Magic and boot the computer to Windows for the next steps.
The above commands install SYSLINUX to the partition boot sectors for the 2nd to 6th partitions (4th excluded), and places the file ldlinux.sys into each partition’s root directory. These commands make the partitions bootable using GRUB4DOS. The device itself is bootable because of the boot flag in the first partition.
Note: you will not see a response each time the above commands are executed unless there is an error.
4. In Windows, install SYSLINUX and the MBR for the USB Drive (use Windows for the remainder of Steps)
a. Exit Parted Magic and reboot the computer to Windows. Open My Computer to identify the Windows USB drive letter assignment.
Note that for hard drives, Windows can access multiple partitions, but for USB drives, Windows can only access a single bootable partition.
b. Open a CMD window using Start -> Run -> enter “CMD” and then hit OK. In the CMD window, navigate to the win32 folder of the extracted Syslinux folder. For example, if you extracted SYSLINUX to C:\syslinux-3.84, then cd to “syslinux-3.84\bios\win32” and enter the following command: “syslinux.exe -sfma x:” Be sure to substitute “x” with the letter assignment of your USB drive identified in My Computer.
This is an explanation of the above syslinux.exe command from the SYSLINUX Wiki:
-s Safe, slow, stupid: uses simpler code that boots better.
-f Force installing.
-m MBR: install a bootable MBR sector to the beginning of the drive.
-a Active: marks partition #1 active (=bootable)
(Note: Setting the boot flag was done already in GParted, but it won’t hurt to do it again).
The above command installs a bootable MBR to the first partition of the USB drive, making SYSLINUX the boot manager for the USB device.
5. Copy GRUB4DOS to Root of Partition #1
Because SYSLINUX is the primary boot-loader for the USB Drive, only two files are needed to boot GRUB4DOS: (1) “grub.exe” and (2) “menu.lst”.
a. From the extracted GRUB4DOS folder, copy and paste “grub.exe” to Partition #1 (see next section for menu.lst).
6. Create and Configure the syslinux.cfg file and menu.lst Files to Root of Partition #1
a. Save the following two files as syslinux.cfg and menu.lst (either open in your browser by clicking them to cut and paste or right click the links and save):
syslinuxcfg.txt (be sure to save as syslinux.cfg)
menulst.txt (be sure to save as menu.lst)
The syslinux.cfg file is used to set the configurable defaults for SYSLINUX. The menu.lst file sets the configurable defaults for GRUB4DOS. Note that the “l” in menu.lst is a small “L” and not the number “1”. Both files can be edited using a simple text editor.
7. Add Additional Modules to Root of Partition #1
Copy the following modules from the SYSLINUX extracted folder to the root of Partition #1:
- vesamenu.c32 from “com32\menu” (optional – creates a fancier menu with splash image. See Create Custom Grub4Dos, GRUB and Syslinux Compatible Splash Images for using splash images with vesamenu.c32)
- reboot.c32 from “com32\modules” (required – adds an option to reboot the computer)
- menu.c32 from “com32\menu” (required – displays the basic Syslinux menu shown below)
- memdisk from “memdisk” (required – kernel to boot floppy images, disk images and some ISOs)
Optional:
Save the following two files and save them to the root of Partition #1 (either open in your browser by clicking them to cut and paste or right click the links and save):
submenulst.txt (save as submenu.lst) Provides an extra menu for GRUB4DOS to boot other apps and distros if needed
help.txt (save as help.txt) Provides a user-defined help menu when F1 is pressed while the Syslinux menu is displayed
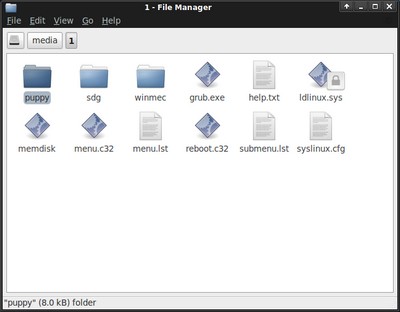
Partition #1 should now look like this:
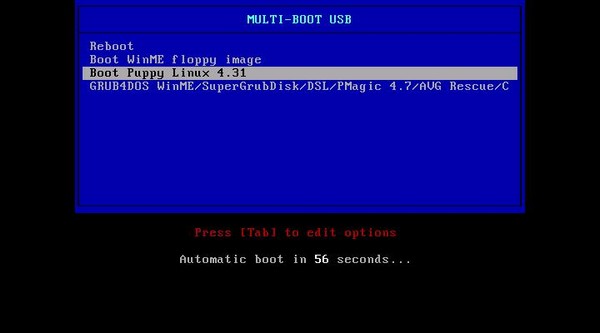
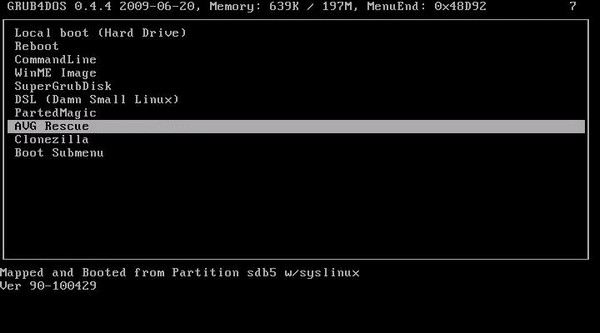
If you followed the above instructions, you should have a working multi-boot, multi-partition USB. The SYSLINUX boot screen should be similar to the screen-shots below when you boot the USB drive. If you receive boot errors when booting to or selecting from the SYSLINUX menu, try installing SYSLINUX to the partition boot sectors again (step 3) and reinstalling the SYSLINUX/MBR to the boot partition (step 4). Also, use GParted to view the partitions for any errors. Errors in GParted will display as a yellow triangular symbol for that partition.
Syslinux Boot Menu Screen
GRUB4DOS Boot Menu Screen
Other free Windows based Multi-boot USB creation Tools:
XBOOT – Another tool to create multi-boot USBs and ISOs. No personal experience with this tool as of yet. Requires the .NET framework ver 4.
SARDU (Shardana Antivirus Rescue Disk Utility). No personal experience with this tool as of yet.


Spelling error report
The following text will be sent to our editors: