Normally, deleting directories is fairly quick if they contain a modest number of sub-directories and files. But when directories have complex structures, consisting of hundreds or thousands of sub-directories and files, it may take several minutes or even hours to delete them. The command line, with less overhead, can delete complex directories in a fraction of that time, sometimes quoted as being 20 times or more faster than the traditional explorer option. This guide demonstrates how to automate deleting large directories using batch files or directly from the command line using native Windows commands and tools, and with selected freeware GUI deletion programs that include a command line option. An additional section tests and compares the deletion speeds of the various deletion tools covered in this guide.The emphasis of this guide is on the quick deletion methods and not on secure or permanent deletion methods that are used to make files unrecoverable. Secure deletion methods are another topic and are necessarily slower since they involve overwriting files, often using several passes.

Explorer can be extremely slow when deleting directories because it calculates the folder size, the number of items in the folder, and the estimated completion time before processing, and reports on the items deleted, remaining deletions, current deletions, and while monitoring and reporting on any conflicts during processing. These processes are still in effect even when the recycle bin is emptied or when files and folders are deleted directly using Shift+Del. Using the command line eliminates this overhead, resulting in a faster deletion process. Keep in mind that faster means relative to the standard deletion process, so deleting several Gigabytes of files and directories may still take a significant amount of time. For example, tests performed by a SuperUser member found that it took an average of 53 minutes to delete 28.3 GB consisting of 1,159,211 files in 146,918 folders using the fastest command line method tested (a combination of the DEL and RMDIR commands). If files and folders are to be deleted on a regular basis, probably the fastest method is to save them to a dedicated partition and then format that partition to delete everything.
Commands
Although the RMDIR command can remove a directory and its files, it’s significantly slower than using the DEL and RMDIR commands in a two-step process. The DEL command deletes the files, and the RMDIR command deletes the directory structure.
del /f/q/s "%folder%" >nul
Acts as a first pass to delete files and outputs to nul to avoid the overhead of writing to the screen
rmdir /q/s "%folder%"
2nd pass that removes the directory structure
- /f – Force delete read-only files
- /q – Quiet mode, do not ask to delete
- /s – Include subdirectories
RoboCopy
Another method for deleting folder files is RoboCopy. A destination folder is mirrored from an empty source directory, which forces RoboCopy to delete any files not in the source directory.
The main command for RoboCopy to delete all files in the destination directory:
robocopy "EmptyDir" "DestinationDir" /MIR /ETA
- /MIR – Mirror a directory
- /W:0 – Sets wait time between retries to zero secs
- /R:0 – Sets number of retries on failed copies to zero secs
RoboCopy works with directories and sets of files within directories as opposed to individual files. In the example batch files using RoboCopy, RMDIR is still used to remove the temporary empty directory and the parent destination directory, and DEL is used for deleting files.
Using Batch Files
Batch files, including the example files below, may be used from the command line (with parameters), from the send-to directory, the right-click context menu, or by drag and drop (the easiest method).
Command line
The batch files may be executed from a Windows command prompt with parameters, or added to the environmental path for convenience.
To execute from a command prompt, open a new cmd prompt, navigate to the batch file’s location and enter its full name, or enter the batch file’s full path. Be sure to add the directories and/or files to delete as parameters. Also include quotes around any file paths with spaces:
Ex. “C:\Program Files\delete_file_folder_fast_simple_v2.bat” “C:\Folder or file to delete”
Separate multiple parameters with a space between parameters.
Adding a batch file’s folder to the Windows environment variable allows it to be available from any cmd prompt without navigating to the batch file’s location or typing its full path. To add a batch file’s path to the Windows environment use:
start–> Control Panel–> System–> Advanced system settings–> Advanced Tab–> Environment Variables–> System Variables–> Path–> Edit.
Add the path e.g., ;C:\path to the batchfile; to the end (don’t forget the single semicolons at the beginning and end). Hit OK three times.
Right-click Context Menu
This option allows the user to right-click a folder and select the batch file from the pop-up menu. The steps to enable this are:
- Press the WINDOWS KEY + R to open the Run dialog box
- Enter regedit and press ENTER
- Navigate to HKEY_CLASSES_ROOT\Directory\shell\
- Right-click on the yellow shell key. Select New > Key
- Enter a name: Delete &Fast then press ENTER
- Right-click on the Delete &Fast folder created, and select New > Key
- Enter “command” and press ENTER.
- Left-click on the yellow command key created. Double-click the (Default) entry.
- In the Value Data field, enter the batch file to use, e.g., cmd /c \”C:\\Path to\\delete_file_folder_fast_simple_v2.bat\” %1″ then press OK
Another way to accomplish the above is to use a reg file. Copy the code below, paste it into a file editor and save it as “Delete Fast.reg”. Double click the file to merge its contents to the registry and the right-click menu is ready to use.
Windows Registry Editor Version 5.00

[HKEY_CLASSES_ROOT\Directory\shell\Delete &Fast\command]
@="cmd /c \"C:\\Path to\\delete_file_folder_fast_simple_v2.bat\" %1"
Send to Directory
Another option is the Send to directory, Just create a shortcut and add it to the appropriate directory:
For newer versions of Windows, the send to directory is located at:
C:\Users\<yourusername>\AppData\Roaming\Microsoft\Windows\SendTo
For XP, the location is:
C:\Documents and Settings\<yourusername>\SendTo
To use, right click a file or directory and select the batch file from the Send to menu.
Drag and Drop
The easiest way to use the example batch files is to just drag and drop folders or files onto them. No files or folders will be deleted without user confirmation.
Differences in the Example Batch Files
delete_files_folders_fast_v2.bat – lists multiple files and folders to be deleted, the parent directory, limited folder/file attributes, and limited information on the names and numbers of files and folders deleted. Also includes a delayed exit, allowing the files and folders deletion information to be reviewed before the window closes (default 10 seconds).
delete_file_folder_fast_simple_v2.bat – limited to deleting one file or one folder at a time. Doesn’t provide much interaction or feedback except to ask the user if they actually want to delete the displayed file or folder. Automatically exits after deleting the file or folder.
delete_files_folders_fast_robocopy_v3.bat – essentially the same as delete_file_folder_fast_simple_v2.bat except that RoboCopy’s output is displayed during execution and after processing files. The batch file is paused after execution allowing the user to view the results without automatically exiting. Updated 01-29-20.
delete_files_folders_fast_robocopy_silent_v3.bat – essentially the same as above except that RoboCopy’s output is NOT displayed for faster execution and processing. The batch file automatically exits after a delay of 10 seconds. Added 01-29-20.
delete_file_folder_fast_simple_robocopy_v2.bat – limited to deleting one file or one folder at a time.Uses RoboCopy instead of DEL for deleting folder contents. RoboCopy output is redirected to nul to eliminate command output. Automatically exits after deleting the file or folder.
delete_file_folder_fast_byenow_v1.bat – uses command line program byenow to delete a folder and all of its files and subdirectories.Uses byenow’s default settings. Batch file pauses on completion.
delete_file_folder_fast_byenow_ntapi_v1.bat – uses command line program byenow to delete a folder and all of its files and subdirectories. Same as previous batch file but uses –delete-ntapi option. Batch file pauses on completion.
The batch files may be renamed and will work identically.
Example Batch Files using DEL, RMDIR, and RoboCopy
Left-click to view the file in the current window, or use right-click and “Save Link As” to download.The batch files are changed from the previous versions as the /S switch greatly slowed performance when deleting individual files. The /S switch is still used, but only for folders.
Note: Remove the “.txt” extension before using.
The batch files below use only the RMDIR and DEL commands.
 delete_files_folders_fast_v2.bat (4.0 KiB, 3,108 hits)
delete_file_folder_fast_simple_v2.bat (1.2 KiB, 1,935 hits)
The below batch files use RoboCopy to delete folder files, RMDIR to delete empty folders, and DEL to delete individual files. If RoboCopy is installed but not included in the Windows environment path, be sure to change the path for RoboCopy for your system in the batch file (don’t forget to remove the REM to enable it). No changes to the batch files are required if RoboCopy is already installed and included in the path. To check, type “robocopy: in a command prompt. If RoboCopy executes, it’s already installed and included in the environment path.
delete_files_folders_fast_robocopy_v3.bat (4.6 KiB, 2,171 hits)
delete_files_folders_fast_robocopy_silent_v3.bat (5.1 KiB, 1,916 hits)
delete_file_folder_fast_simple_robocopy_v2.bat (1.7 KiB, 2,272 hits)
Freeware Deletion Tools
A number of GUI and command line file and folder deletion tools are available, but most focus on secure deletions and don’t provide an option for standard deletions. The freeware utilities below are able to perform both standard and secure deletions from the GUI and from the command line.
These GUI-based tools work from the command line either through the main executable for by using separate command line executables. The advantage of using these tools rather than using native windows commands like RMDIR and DEL is that it’s easier to configure complex deletion options such as deleting files or folders based on modification or creation date, size, or type, as well as to write logs, send the process to background, set automatic system shutdowns, exclude/include specific files and folders, stop on errors, and set many other options using a single command line.
FastCopy
FastCopy is a copy/backup utility that can also perform standard and limited secure deletions on individual files and folders. It can be installed as a regular program or as a portable application by selecting extract during installation. The program executable also accepts commands from the command line.
Files and folders can be dropped and dragged onto the interface to set the source or destination directories. From the Options menu, the program can be configured to install shell extensions to enable FastCopy to delete, copy, or move files/folders by using the right click menu in Windows Explorer.
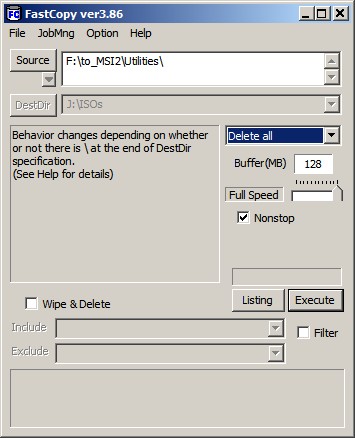
FastCopy Interface
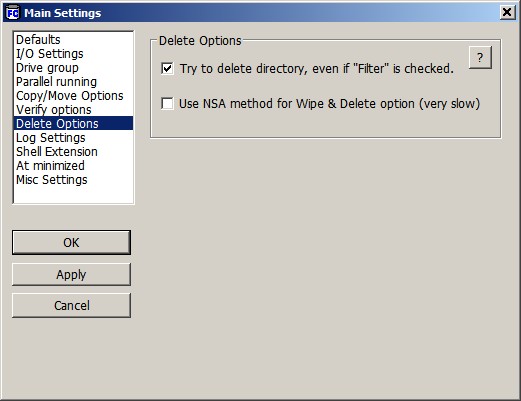
FastCopy Delete Options
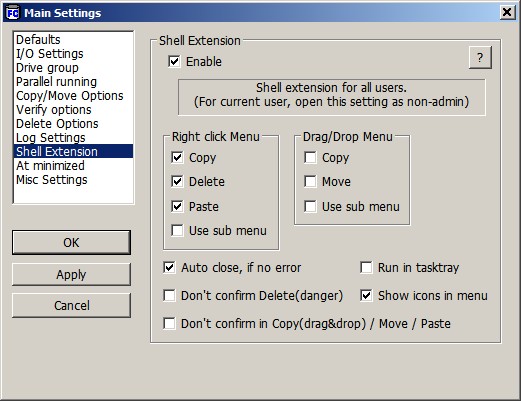
FastCopy Shell Extension Options
FastCopy Command line and Batch File
A listing of FastCopy’s command line options can be found online help page and in the application’s help file. The below batch file is configured to delete files and folders using drag and drop with two options: (1) Do NOT ask for confirmation before deleting and disable logging, and (2) Ask for confirmation before deleting and enable logging. The batch file pauses after execution. The batch file is configured to use a portable installation.
The breakdown of the first FastCopy command line (no confirmation, no logging):
FastCopy.exe /cmd=delete /no_confirm_del /log=FALSE /auto_close %*
- /cmd=delete – delete command
- /no_confirm_del – Don’t confirm before deleting
- /log=FALSE – Disable write operation/errors information to the logfile
- /auto_close – Close automatically after execution is finished with no errors
- %* – All dragged and dropped files and folders
Example Batch File for FastCopy (remove .txt extension before using):
Fastcopy_delete_file_folders_v1.bat (1.7 KiB, 1,484 hits)
Fast Folder Eraser Pro
Fast Folder Eraser Pro is an installed freeware program. It can perform both standard and secure deletions both from the command line or from the GUI interface. The standalone command line executables are located in the command-line folder which contains two CLI executables, a 32-bit version and a 64-bit version.
This is a utility specifically designed to delete directories and the sub-folders and files within them. Unlike FastCopy, it’s unable to delete individual files by filename, but it’s able to delete individual or groups of files based on size, dates, and other filters, and it can exclude files using wildcards. Although folders and files can be directly dragged and dropped onto the GUI interface for deletion, testing revealed that when a file was dropped on the GUI, the program also deleted every other file and folder within the same directory as the dropped file. There were no issues with folders dropped onto the GUI or deleted using the CLI executable. The CLI executable is unable to delete individual files and generates an error if an individual file path is used with the delete command.
Compared to FastCopy, the number of command line options is limited. For example, no option exists to enable or disable confirmation before deleting a file, so a confirmation option must be programmed into the batch script using Windows commands to obtain this functionality.
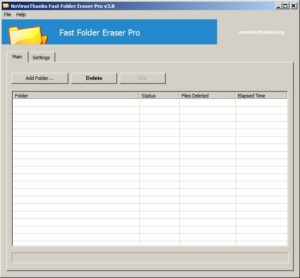
Fast Folder Eraser Pro Interface
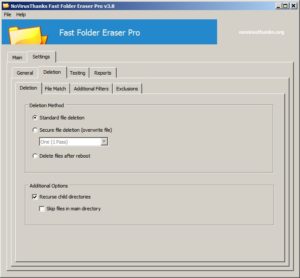
Fast Folder Eraser Pro Delete Options
Fast Folder Eraser Pro Command line and Batch File
The help file for the standalone CLI executables is located in the command-line folder along with two executables, a 32-bit CLI executable, FFECmd32.exe, and a 64-bit executable, FFECmd64.exe. The batch file below is configured for drag and drop using the 32-bit executable, includes confirmation before deletion, and pauses after execution.. Unlike FastCopy where multiple files and folders can be processed using a single command, the CLI executable in Fast Folder Eraser Pro is able to process only a singe folder at a time. If multiple folders are dragged and dropped onto the batch file, folders after the first are ignored. If a file or multiple files are dropped onto the batch file, the files are not processed.
The breakdown of the Fast Folder Eraser Pro command line as used in the batch file:
FFECmd32.exe /path %* /r /logfail
- /path %* – absolute path of directory to initiate deletion
- /r – recurse child directories
- /logfail – log unsuccessful file deletions to a log file
Example Batch File for Fast Folder Eraser Pro (remove .txt extension before using):
FastFolderEraserPro_delete_file_folders.bat (903 bytes, 1,386 hits)
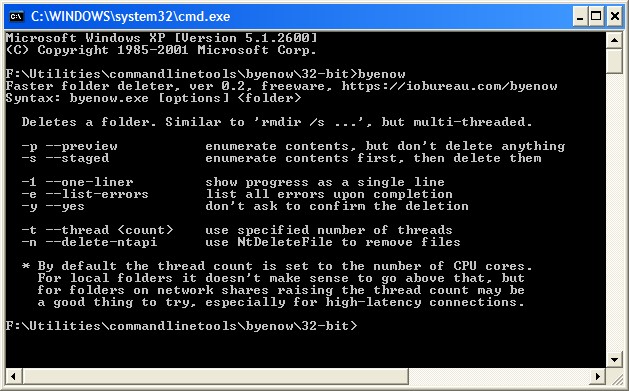
byenow Command Line Utility
byenow is a specialized command line tool specifically designed to delete files and directories under a single folder. It uses several strategies not found for other deletion tools to streamline and optimize the deletion process such as: (1) providing essential, but not verbose, processing information, (2) the option to suppress confirmation, (3) using all available CPU cores by default, and (4) the option to use the NtDeleteFile API instead of the standard deletion process (DeleteFile API) to delete files. The NtDeleteFile API is faster because it requires only a single syscall instead of the three syscalls needed by the standard DeleteFile API. byenow also displays the time required for the deletion process upon completion. Below is a summary listing of byenow’s user settable options:
- preview the number files and folders to be deleted
- set the number of threads (uses same number of threads as CPU cores by default)
- suppress confirmation
- list errors
- display progress on a single line
- staged deletion – scan folder 1st and then delete
- use NtDeleteFile API instead of the default DeleteFile API
byenow Options
byenow Preview
byenow Command line and Batch File
Because byenow is already optimized for file deletion using its default settings, and its options are settable from the command line, only a basic batch file is needed to launch the program in a command window. Two batch files are provided, one with default settings and the other using the NtDeleteFile API. Because byenow is a command line only program, be sure to set the path for byenow in the batch files.
The breakdown of the byenow command line (with NtDeleteFile API option):
byenow “%~1” –delete-ntapi
- –delete-ntapi – use NtDeleteFile API instead of DeleteFile API
Example Batch Files for byenow (remove .txt extension before using):
delete_files_folders_fast_byenow_v1.bat (1.6 KiB, 1,510 hits)
delete_files_folders_fast_byenow_ntapi_v1.bat (1.6 KiB, 1,324 hits)
Batch File Benchmarks
The batch files were compared by benchmarking them using the standard Windows deletion process as a baseline. Nine identical test directories were created, each comprised of 12255 files in 1599 directories, and totaling 1658MBs. Each batch file was timed using a timer and/or using the logged times where appropriate to measure how long it took them to delete the test directory.
| Batch file | Results (min:secs) |
| delete_file_folder_fast_simple_robocopy_v2.bat | 0:26 |
| delete_files_folders_fast_byenow_v1.bat | 0:27 |
| delete_files_folders_fast_robocopy_silent_v3.bat | 0:31 |
| delete_file_folder_fast_simple_v2.bat | 0:32 |
| delete_files_folders_fast_byenow_ntapi_v1.bat | 0:33 |
| delete_files_folders_fast_v2.bat | 0:34 |
| Fastcopy_delete_file_folders_v1.bat (confirm) | 0:37 |
| Fastcopy_delete_file_folders_v1.bat (no confirm) | 0:40 |
| FastFolderEraserPro_delete_file_folders.bat | 0:44 |
| delete_files_folders_fast_robocopy_v3.bat | 0:49 |
| Windows Standard Deletion to Recycle Bin* | 1:57 |
*Time includes 0:40 secs to send the test directory to the Recycle Bin and 1 min and 17 secs to empty the Recycle Bin (0:40 + 1:17 = 1:57).
Conclusions
Most of the command line tools tested were faster than using Windows standard delete, especially when the time needed to empty the Recycle Bin was included. The fastest command line tools were nearly twice as fast as the Windows standard delete process that sends files to the Recycle Bin, and over 4 times faster than Windows when the time needed to empty the Recycle Bin was factored in. Suppressing output and disabling logging helped to improve the performance of the command line tools, but the most significant factor appears to be that all the command line tools directly delete files and don’t use the Recycle Bin. The tests suggest that any program that directly deletes files will automatically seem faster in comparison to the full Windows standard delete process, even when they are actually slower than the time Windows takes just to send deleted files to the Recycle Bin. So while command line tools are faster than using Windows Explorer for deleting large directories and files, It appears that claims of increased deletion speeds by multiple factors are likely exaggerated, and a more realistic expectation is probably from 2-3 times faster – at least for the freeware tools tested.
The test machine used was a 1.86GHz 32-bit single core laptop with 2GB of RAM. Some of the programs, such as byenow, are designed to take advantage of multiple cores, so results could vary greatly depending on the hardware and OS used. Also, the test directories were not really representative of a “real world” situation as they were actually small, and most users are unlikely to use specialized deletion tools to occasionally delete directories of less than 3-4 GBs. Although useful as a “rough estimate”, a more realistic test scenario might be to test the various batch file commands on machines with upgraded OS and hardware, and using a larger and more complex directory structure of perhaps 50 GBs or more .
Summary of test limitations:
Test on multiple hardware and OS platforms
Use larger and more complex test directories
Test multiple times to compensate for machine state variation
Related Information and References:
Fastest Way to Delete Large Folders in Windows – Matt’s Repository
How to delete huge number of files on Windows – Superuser